

WPScan is one of the best plugins you can use for vulnerability scanning of your WordPress website. Most of the attackers use WPScan to find out the vulnerabilities on your website. Therefore, you can start using WPScan to remove all the potential attackers and make your website safe for everyone.
It’s quite easy to use this plugin and set it up. We will see a complete tutorial on how to set up WPScan. For that, we will see a step-by-step guide to do so.
After the end of this guide, you will come to know how you can set up WPScan and whether you can use it or not.
Overview of WPScan for WordPress
![]()
WPScan is one of the security plugins that you can use. It works with API. So, when you install the plugin, you will get access to APIs. In the free version, there is limited usage of APIs and you will get a limited number of APIs too. Therefore, you can surely start using the plugin.
Unlike most of the plugins out there, there are not direct modules. As it works on API, it will not use your WordPress resources. Instead, it will work directly on the cloud. The cloud will check for the vulnerabilities and then give the results thereafter.
You can then fix all the infected files directly with one click. This is how you can fix all the files and clean your website.
There are various features you will get here. All of these are accessed by APIs. If you are not aware of it, they also have Linux software. You can use the Linux software to scan your website even if you haven’t installed the plugin. This is limited. Therefore, you should prefer installing the plugin.
Therefore, you can try any of these things as per your choice.
Now, the second thing that you need to keep in mind is that they have two versions. One of them is premium and the other one is free. The important thing is that the free version will cover almost 50% of total websites on the internet. Therefore, you can start using the free plugin.
We will start with the installation part where we will see how you can install the plugin and know how you can get started. This is how you can use the plugin at full capability.
Installing the Plugin
We will start with the basic thing on how you can install the plugin. The installation is the most basic part and you will need to focus on that. Most people know about how you can install the plugin.
For that, we will see the most basic way to install the plugin. You can simply open your WordPress dashboard. Inside the dashboard, you will see a menu called Plugins. When you go to the plugins, you will have to go to the all plugins option. In all plugins options, you will see an option to add a new plugin. You can add a new plugin directly from there.
It will open the WordPress plugin directory directly in the website itself. You will see many plugins available and there will be various tabs. Now, if you start looking for WPScan in the list, it will take you forever to find the plugin.
Therefore, you can search the plugin. There will be a search bar from which you can search your desired plugin. You can enter the name of the plugin that you want to install. In this case, we want to install WPScan. So, we will search for WPScan in the directory.
When we do this, you’ll find the plugin. Simply hit the install button and it will install the WPScan plugin for WordPress.
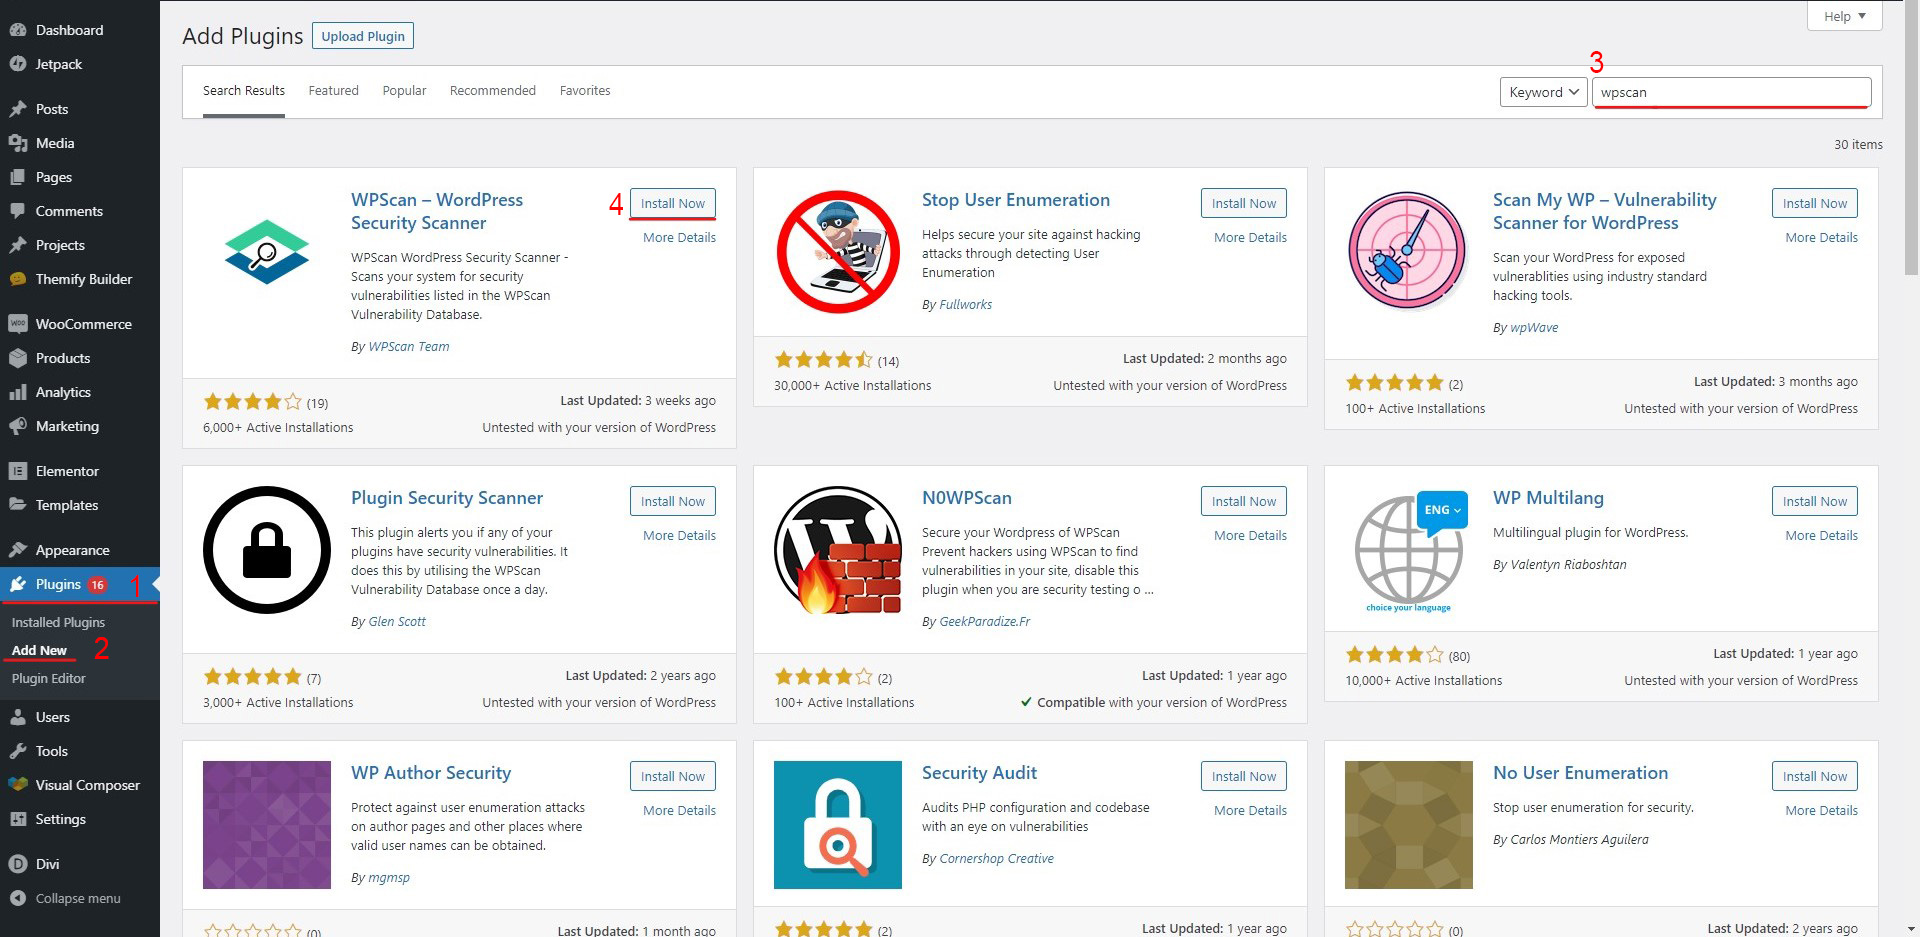
Thereafter, you will have to activate the plugin. After the plugin gets installed, the button will change to “activate”. You can simply click on activate and it will activate the plugin. In this way, you will have a new plugin activated on your website that is WPScan.
If you have the zip file of the plugin, you can upload it and install the plugin from there. There will be an option to upload the plugin.
Registering your Account
As it works directly on the cloud, you will have to create an account at WPScan for your WordPress. There are two plans here. You can either go with the paid plan or you can start with the free plan. Most websites will only need the free plan. The free plan will cover all the basic features that you want to use. This will ensure the security of the website.
When you complete the installation, it will take you to the signup page. You can enter your information there and it will create your account. This is an easy way to create your account without opening the website. When you create an account there, your plugin will be all ready to use. You can start using the plugin.
You can upgrade to the paid plan later on if you want.
APIs and Plans
You will want to know more about API and plans. If you are new, you won’t know about the API, right? Let’s learn more about it.
When you do a certain task in the plugin, it will send an API request. The API request will go to the company’s server. When the API reaches there, it will do the specific process and send the result in the form of an API response. The plugin will display the response to you.
When you run the scan, WPScan will send an API request to the server. It will scan the website from there and show you the result. When you get the result, you can take the necessary action.
If there are multiple plugins, each plugin will have one API request. The same goes for all the other modules such as themes, core files, etc.
These API requests are limited in the free plan. The free plan allows 25 API requests a day. This is enough for more than 50% of the total websites.
So, you can go with the free plan.
If not, there are three other paid plans from which you can choose from. Each of the plans has different pricing and different limits in the API, you can choose the one that suits you the most. In this way, you will get all the capabilities that you want.
You can check more about the APIs and plan on their official website. When you are registering an account, they will show you the complete list of all the plans and ask you to choose one. You can check out all the plans when you are registering an account.
Other than this, you can check out the rest of the guide to know how to set up WPScan for WordPress
Security Checks
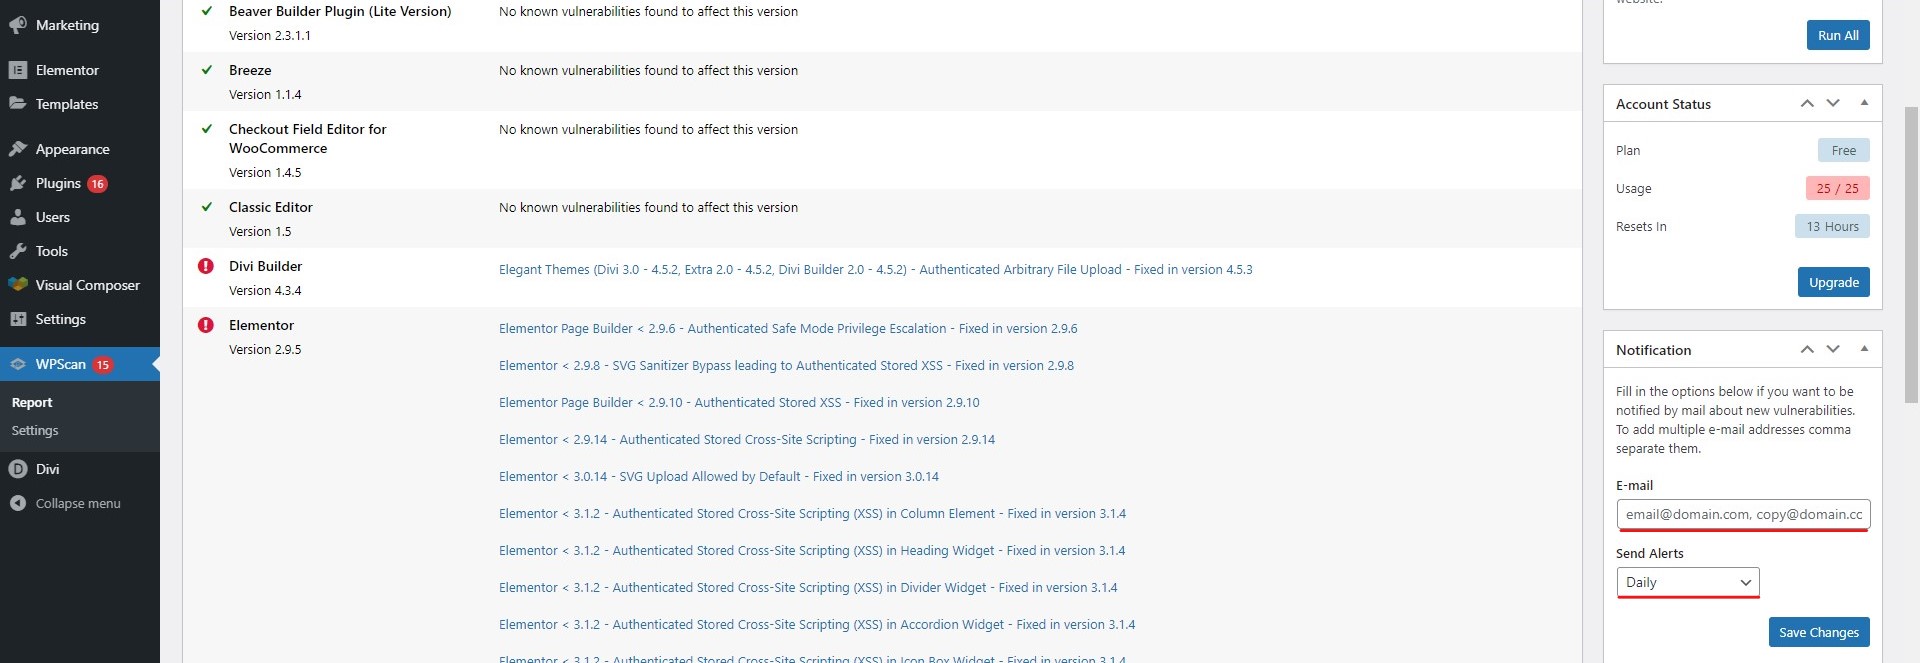
The plugin will perform all the security scans on your website and give you the results. If the plugin detects any vulnerabilities on your website, it will show you the list.
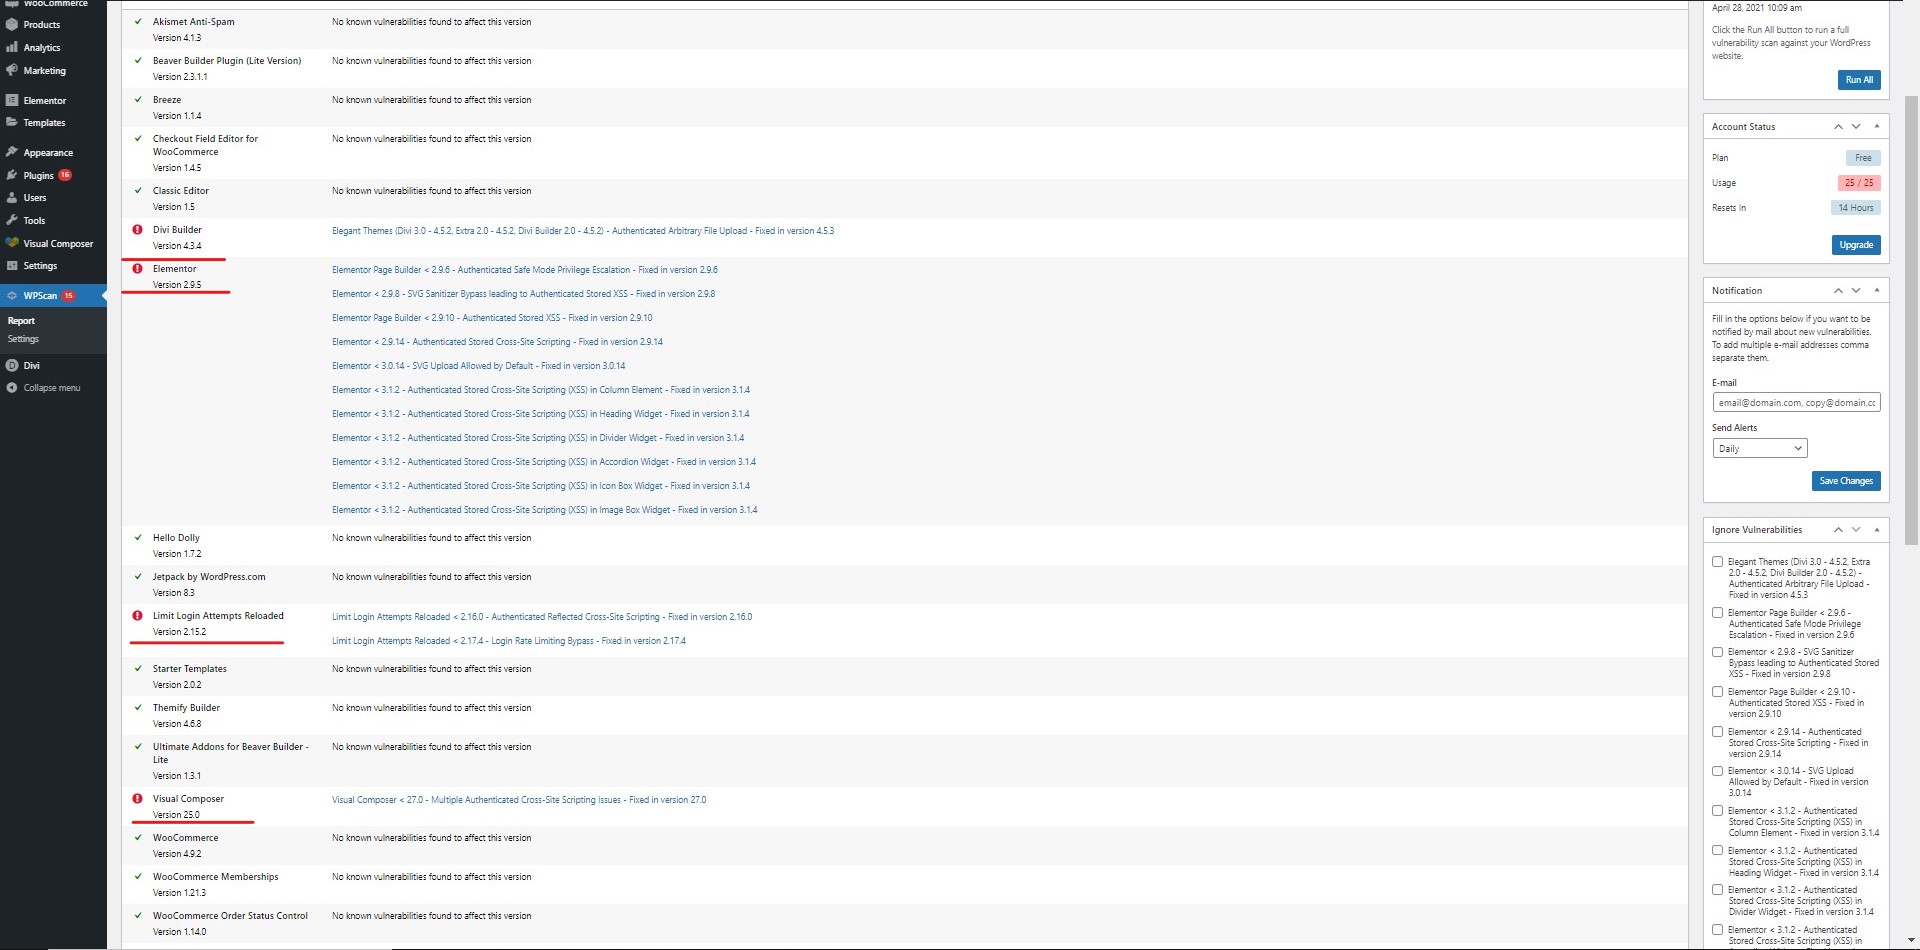
It will also fix the vulnerabilities. However, some vulnerabilities will need your action. For example, if there are vulnerabilities in the plugin which can’t be fixed, you will have to either deactivate the plugin or update the plugin. Luckily, the plugin will also check if there is an update available for the infected plugin or not. If there is an update available for the same, it will tell you to directly update the plugin. Therefore, you can update the plugin in this case.
Further, it will also check for many other security vulnerabilities that will include the entire website scan, debug scan, etc. It will also see if XML RPC is enabled or not. If not, it will tell you to activate it.
Databases and passwords are the next two reasons why your website might be at risk. WPScan plugin will also cover these two things. So, the security scan will include the scanning of these two things.
If there is anything that needs your attention, it will notify you about the same. You can then take the required action and fix the issue.
WPScan scans the entire website which also includes the core files. If any vulnerabilities need your attention, you will get a notification about the same. Therefore, you don’t have to worry about the scanning process. You can rely on WPScan as it does most of the work for you.
Dashboard and Reports – WPScan WordPress
You will see an icon on the website dashboard from which you can access WPScan if you need it. The icon is made to ensure that you can access the plugin without having to come to the plugin and do the work. You can directly do it from the dashboard of your website. Therefore, you can try that out. It makes your security a lot easier. This is how it should be.

If you want to know more about the security and the vulnerabilities you have got, you can use the complete report system. The reports will allow you to know what’s going on on the website. The reports have all the things that you might be looking for.

For example, the report is divided into various parts. In the first part, you will see the modules such as plugin, core files, themes, etc. Inside each part, you will see the name of the plugin/theme. You will see what’s wrong with that plugin or theme and you will also see what are the vulnerabilities. It will show you a quick description of what’s needed to fix the file. Therefore, you can check that out and get the rest of the things done.
Reports are great if you want to know everything in detail. There’s structure is very nice. So, it won’t waste your time knowing what’s wrong with the plugin and what are steps that you need to take. Therefore, you can check that out.
If you are using it daily, we suggest you run the scan and then see the report quickly. The report is the main key to find out what is wrong with your website and how you can fix that thing. Therefore, it will let you know many things using WPScan plugin for WordPress.
Notifications and Other Settings
If you want to get the email of everything that you saw, you can enter your email address in the bottom sidebar. It will also ask you for the frequency. If you want to get the reports daily, you can select daily. In the same way, if you want it weekly, you can use the weekly option here. Thereafter, it will send you the entire report in the email.
There are many settings that you can do here. The settings will allow you to set the scan routine and many more things. Please note that these are the global settings of the plugin. So, if you do any of the changes in the settings, it will apply to the entire plugin. We suggest you check out the entire plugin at first to know what are the features and what are the other interesting things you are getting. If you know about all the things, it will make your website more secure and you will also be more aware of the plugins you install and the things you do on your website.
Final Words about WordPress WPScan
To conclude, this is how you can set up the WPScan plugin. We will see a quick summary here. You will first have to install the plugin; you can do it from the plugin directory. Thereafter, you can create an account there. Now, when the account is ready, you can start the scan. When the scan gets completed, you will see the complete report from which you can take the steps as per the given instructions. Don’t forget to update the plugin whenever there is a new update. The updates will bring better security to your website. Therefore, you should regularly update your plugin.


