

In this tutorial, we will learn how to add the current year shortcode in Elementor. You might not be familiar with shortcodes and their prospective uses, so, additionally, we will take a look at the basics of shortcode integration. Furthermore, in order to create custom shortcodes and use them in Elementor, you will need to understand the relationship between the Parent theme and the Child theme. It might sound like a difficult task for a beginner in WordPress web development, but do not worry, we got you covered!
What is a Shortcode?
Shortcodes are small pieces of text within square brackets, for instance, , that represent a unique, predefined piece of code that can be triggered on demand. Shortcodes can be used almost anywhere where text can be added. In essence, shortcodes enable the user to easily integrate dynamic content into WordPress pages, posts, etc.
In our case, the current year shortcode returns the value of the ongoing year. By implementing this particular shortcode, you will not have to worry about changing the year ever again as it will automatically update itself based on the local time.
WordPress has a few in-built shortcodes available to users, but they are rather limited in their capabilities. As you will accumulate ample experience and knowledge in WordPress web development, you will begin to write your own shortcodes. Let us take the first step towards this direction and create our own custom current year shortcode.
Current Year Shortcode
So, how does the current year shortcode looks like? Take a look at the code snippet below.
function current_year_shortcode() {
$year = date(‘Y’);
return $year;
}
add_shortcode(‘year’, ‘current_year_shortcode’);
This piece of code will return the current year’s value but without the date. For this shortcode to return the current year value, you need to paste into any text-related window. Elementor has a specific widget for shortcodes, but we will get to that later. You may be wondering- how to add this particular piece of code to your WordPress website? Well, first you must understand the relationship between Parent and Child themes.
Parent Theme and Child Theme
You may be familiar with popular themes like Astra, Divi, OceanWP, and many others. Nowadays, gaining access to flexible multipurpose WordPress templates is as easy as it gets. Just locate the Appearance tab in your WordPress dashboard, click on the Themes button and pick the template that suits your website the best.
The theme you picked is called a parent theme. A parent theme is a complete template that consists of all the mandatory WordPress template files and assets that are obligatory for the theme to work. All themes (excluding child themes) are considered parent themes.
What is a child theme? A child theme inherits the design capabilities and functions of the parent theme but can be used to customize and modify any part of the theme. It is an efficient way to keep your modifications separate from the main file and upgrade the parent theme without affecting the customizations you have previously made to your site.
Child Theme Generator
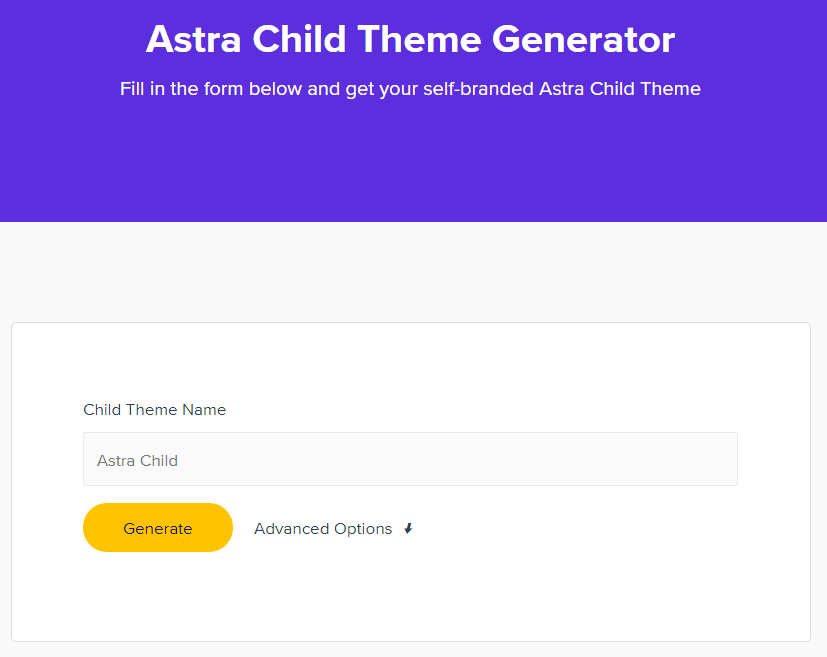
Nowadays, most web developers and designers use child theme generators. It is an efficient way to create child themes with minimal coding involved. There are numerous child theme generator sites available for free online. Just pick one and it will create a child theme for your theme. Some themes offer their own generators, for instance, Astra. If you are well-versed in coding, then you are aware that the only file you need to worry about is the functions.php file. The current year shortcode code snippet needs to be added at the end of the functions.php file in the child theme.
If you want to take a more in-depth look at the child theme creation, then continue reading this article and let us build a custom child theme together. If not, then you can skip to the “Adding the current year shortcode to the Elementor” section in this article.
Creating a Custom Child Theme
Let us start by creating a new folder in the themes directory, located at wp-content/themes. It is a good practice to keep the name of the folder the same as the parent theme, but with –child appended at the end. For example, Astra-child or OceanWP-child. Keeping everything organized is a good habit in the world of web development as you never know who might have to take a look at your website or code.
Next, you will need to create a stylesheet file named “style.css”. Consequently, this file will contain all of the CSS rules and declarations that regulate the appearance of your theme. At the very top of the file, you will need to insert a comment with the information about the theme you are using. As an example, we will use the Astra theme.

In most cases, only the Theme Name and Template are essential for linking the child and parent themes, but in certain situations, additional info may be required. Add remaining information as applicable. The only file required for the child theme is the style.css file, but functions.php is fundamental to enqueue styles correctly.
Enqueue Stylesheet and functions.php
Now, all we need to do is to enqueue the parent and child theme stylesheets. Previously, the common practice was to use the @import rule inside style.css to link the stylesheets together. However, this is no longer recommended as it increases the loading time for stylesheets and it is likely that the parent stylesheet will get loaded twice.
The goal is to have both the Parent and Child themes load at the same time. Unfortunately, not all themes do this. By examining the parent themes code, you will be able to see whether they are able to load at the same time. You will need to locate the handle name that the parent theme makes use of. The handle is the first parameter of wp_enqueue_style().
It is recommended to enqueue stylesheets by adding the wp_enqueue_scripts action and wp_enqueue_style() in your child themes functions.php file. If the child theme does not have a functions.php file, then you will need to create one in the child themes directory. Consequently, if the parent theme loads both stylesheets, then the child theme does not need to do anything.
If you noticed that the parent theme enables the style by making use of a function as get_template_directory or get_template_directory_uri, then the child theme needs to load just the child styles, using the parents handle in the dependency parameter.
add_action( ‘wp_enqueue_scripts’, ‘my_theme_enqueue_styles’ );
function my_theme_enqueue_styles() {
wp_enqueue_style( ‘child-style’, get_stylesheet_uri(),
array( ‘parenthandle’ ),
wp_get_theme()->get(‘Version’) // this only works if you have Version in the style header
);
}
If the parent theme loads the style using a function like get_stylesheet_directory() or get_stylesheet_directory_uri(), then the child theme needs to load both parent and child stylesheets. You need to use the parent themes handle name for the parent styles.
add_action( ‘wp_enqueue_scripts’, ‘my_theme_enqueue_styles’ );
function my_theme_enqueue_styles() {
$parenthandle = ‘parent-style’;
$theme = wp_get_theme();
wp_enqueue_style( $parenthandle, get_template_directory_uri() . ‘/style.css’,
array(), // if the parent theme code has a dependency, copy it to here
$theme->parent()->get(‘Version’)
);
wp_enqueue_style( ‘child-style’, get_stylesheet_uri(),
array( $parenthandle ),
$theme->get(‘Version’) // this only works if you have Version in the style header
);
}
Installing and Activating the Child Theme
Now, we have finished setting up our child theme and all we have left is to install and activate it. The child theme is installed like any other theme. In your WordPress dashboard click on Appearance > Themes > Add New and upload the .zip file. If you use FTP, then you can just copy the folder to the site. Now your child theme is ready for activation. Locate the Appearance tab, then Themes and activate the child theme.

Keep in mind that functions.php is the only file in the child theme that does not overwrite its counterpart in the parent theme. By taking into account this fact, you can make any modifications you want in the functions.php file without the fear of deleting your website or experiencing “the white screen of death”. You can add the aforementioned current year shortcode function to the functions.php file and see the results for yourself.
Adding the Current Year Shortcode to the Elementor
You must be weary after reading the previous paragraphs, but fret not, the hard part is over and you can enjoy the fruits of your labor. The Elementor team has done an admirable job by integrating shortcodes into any text-related widget. They even have a specific widget for shortcodes. Elementor also generates shortcodes for templates and global widgets.
Now, let us open any page, post, etc. in your WordPress dashboard and edit with Elementor. Locate the widget panel in the upper left corner and choose the shortcode widget. As mentioned previously we can use any text-related widget, for instance, the heading widget. For the sake of this tutorial, we will use the shortcode widget.

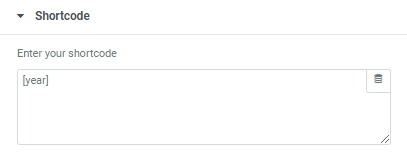
All you have to do is write or copy the above-mentioned shortcode to the shortcode window in the left sidebar and, voilà, you can see the current year. The same recipe works for any other shortcode you might want to use.
Note that text widgets might not instantly display shortcodes, so you will have to preview the document in order to see the changes.
Adding Current Year as Dynamic Content in Elementor
Truthfully, having substantial knowledge about shortcode use and implementation is an incredibly valuable skill in WordPress web development, but if you have subscribed to the Elementor Pro, then you might be aware of the numerous options the Elementor dynamic content function offers. In our case, the current year shortcode. We might as well use the dynamic content and achieve the same result.
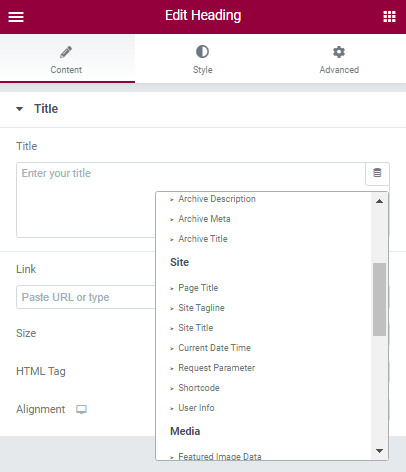
The dynamic content is available to almost any feature the Elementor supports. As an example, we will use the heading widget. You will see a small icon in the upper right corner of the title window. Click on it and you will see a multitude of options accessible to you. As far as we are concerned, we need to display the current year on our website. Locate the Site section underneath the dynamic content tab and choose the “Current Date Time”.
As you can see, the date, time, and current year have been displayed on our page. But we want to only show the current year, not the date and time. Click again on the title window and the settings menu will open. Evidently, two options are available to you- Date Format and Time Format. Now, click on the Date Format and choose the Custom option. You will be presented with a sequence of seemingly random letters (their meaning can be found in the Elementor documentation).
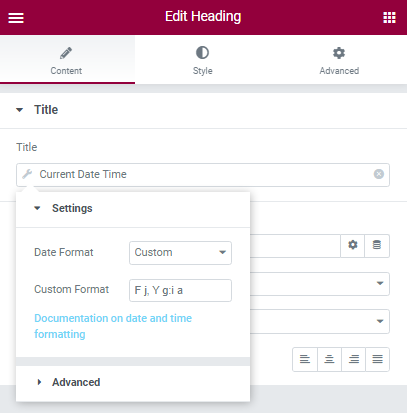
In our case, we will delete all the letters and write the uppercase “Y” in their stead (lowercase “y” will display only the last two numbers of the year). Now the heading widget displays only the current year. You should consider this as an alternative to adding the current year shortcode in Elementor via the shortcode widget.
Plugins for Shortcodes
In this day and age, there are plugins for everything, including shortcodes. Especially, a beginner in WordPress web development might not want to waste his time on child theme creation and might opt to use the plugins to ease his workload. Elementor has integrated shortcode plugins into its design with great care, so you would be able to implement them on your website without breaking it. We will list a few of the most popular and reliable shortcode plugins for WordPress:
- Shortcode Ultimate
- WP Shortcode Pro
- Shortcoder
- Woo Shortcodes Kit
- GT Shortcodes
- WordPress Shortcode
- Vision
- Fruitful Shortcodes
- Supreme Shortcodes
- Etc.
As you can see, the options are plentiful. It is up to you to choose which one suits your needs the best. A variety of them offer additional options besides shortcodes and shortcodes themselves differ quite a lot from plugin to plugin, but, in essence, they all try to achieve the same goal- provide you with enough shortcodes, so you would not have to create custom shortcodes by yourself.
Final Words
There are numerous ways how you can add the current year shortcode in Elementor or WordPress sites in general. It is up to you to choose the method that serves you the best. We hope that this article has helped you make your choice and adding the current year shortcode in Elementor now is trivial to you. Have a great journey in the world of WordPress web development and stay tuned for more articles.
Frequently asked questions
How can I use the current year shortcode in Elementor to display dynamic content, such as copyright information or event dates?
The current year shortcode in Elementor allows you to dynamically display the current year anywhere on your Elementor-designed pages. You can insert the shortcode directly into text elements, widgets, or custom HTML areas within your Elementor layout, providing flexibility in how and where you display the current year.
Are there any limitations or restrictions on where I can use the current year shortcode within Elementor, such as specific widgets or sections?
There are generally no specific limitations on where you can use the current year shortcode within Elementor. You can include it in text elements, headings, footers, or any other section of your Elementor layout where you want to display the current year. However, it’s essential to ensure that the shortcode is supported by any third-party widgets or elements you may be using.
Can I customize the output format of the current year shortcode to match the design or styling of my Elementor page?
Yes, you can customize the output format of the current year shortcode to match the design or styling of your Elementor page. The shortcode itself only outputs the current year, but you can apply custom styling using Elementor’s built-in style options or by adding custom CSS code to your page. This allows you to control the font size, color, alignment, and other visual aspects of how the current year is displayed.
Does the current year shortcode automatically update to display the current year, or do I need to manually update it each year?
The current year shortcode automatically updates to display the current year, so you don’t need to manually update it each year. Whenever the page is loaded or viewed, the shortcode will dynamically output the current year based on the server’s date and time settings. This ensures that your copyright information or other content featuring the current year remains accurate without requiring manual updates.
Are there alternative methods or plugins available for adding the current year to Elementor pages, and how do they compare to using the shortcode method described in the article?
While the current year shortcode method described in the article is a straightforward and native solution within Elementor, there may be alternative methods or plugins available for adding the current year to Elementor pages. Some plugins offer similar functionality by providing widgets or modules specifically designed to display dynamic dates or copyright information. Comparing these alternatives to the shortcode method may involve considerations such as ease of use, compatibility with other plugins, and additional features offered by the plugin.


