

WooCommerce set-up can seem rather perplexing the first time you are to implement it in your WordPress website. Indeed, knowing how to construct a solid foundation for your online store and efficiently enabling all of its features is an indispensable skill in web development. WooCommerce has been an e-commerce market leader for quite some time now. The latest statistics from 2021 show that 93.7% of all WordPress e-commerce sites use the WooCommerce plugin. By being acquainted with the available features and understanding them thoroughly, you can create online stores in a breeze. Let us take a look at what makes the WooCommerce plugin such a powerful e-commerce tool.

Why Choose WooCommerce?
Ever since its inception in 2011, WooCommerce has been a staple in WordPress online stores. At the moment, WooCommerce is the most popular plugin on the entire internet, with a 68% usage distribution. 28,19% of all online stores are powered by WooCommerce. You must be asking, what makes the plugin so popular? Well, let us take a look at what makes WooCommerce stand out among the competition.
Low Entry Cost
One of the main selling points is the fact that WooCommerce is free. You can build a fully operational online shop without spending a penny. Keep in mind that, in order to access certain new features and enable additional functionality, you will need to acquire the paid extensions. Even though there is some cost involved, it is nothing in comparison to proprietary e-commerce solutions. Let us not forget that there are costs associated with running a WooCommerce store- hosting plan, domain name, themes, security, plugins, extensions, maintenance costs, payment processing fees, and so on. Nevertheless, the base platform itself is free to install and do as you like.
Feature-rich
You can sell everything with WooCommerce, be it physical products, digital products, or anything in-between. Any type of variation can be adjusted to your needs- colors, sizes, attributes, grouped products, et cetera. Every product can be created according to your specifications, not to mention that there is a limitless amount of products you can create.
Developer Friendly
WooCommerce is fully open source and managed on GitHub. You can participate in further development yourself if it is your cup of tea. As a consequence, the plugin easily integrates with most of the WordPress themes, not to mention the highly fruitful collaboration with the page-builder Elementor. WooCommerce has created its own API which receives security reviews on a regular basis. Their homepage features comprehensive documentation.
Loads of Extensions
There are more than 700 official extensions available in the WordPress plugin repository in addition to new ones being created every day. From memberships and subscriptions to payment gateways and shipping providers, you can find the extension you need with ease.
Creating a WordPress Website and Installing WooCommerce
WooCommerce is a WordPress plugin, so let us take a look at the basics of WordPress website creation first.
Firstly, you will need to get a web hosting plan. Any WordPress website requires a domain name and a web hosting service. There are several trustworthy hosting services available for WordPress users. Take a look at what different services offer and pick one that best meets your requirements. Follow the host’s guidelines and begin setting up your website.
Secondly, pick a domain name. The domain name should consist of your brand name and indicate what kind of a store it will be. Take time when deciding upon the name, it is crucial to have a clear and concise name. You should refrain from using hyphens in your domain. We advise you to choose .com as your domain extension, as it is well known for being an established business-oriented extension. You should consider purchasing your domain name together with your hosting plan as it will allow you to manage your website with ease.

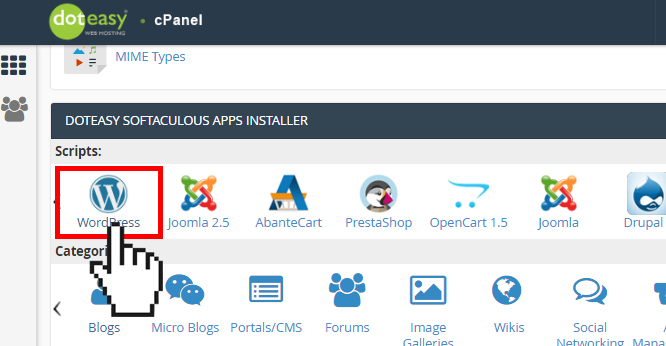
Thirdly, install WordPress. Now that you are done with the hosting plan and domain name, it is time to install WordPress. You will receive an e-mail from your hosting provider with instructions on how to access and set up your account. After you have logged in to your hosting account, click on the My Accounts tab and then log in to your cPanel. Then, click on the WordPress icon and follow the steps in order to install WordPress. Enter your username and password among other basic information. Finish setting up your website.
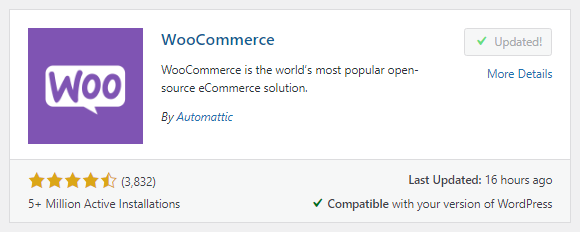
Fourthly, install the WooCommerce plugin. Your WordPress website has been created and now it is time to add the e-commerce functionality to it. WooCommerce is installed just like any other plugin. Locate the Plugins tab in your WordPress dashboard and click on it. Search the WordPress repository for the WooCommerce plugin and download it. Do not forget to activate it after the installation.
Setting up WooCommerce with the Setup Wizard
When WooCommerce is activated for the first time, it will take you to the WooCommerce Setup Wizard screen. Although everything can be set up manually, it is beneficial to use this feature as it allows you to configure the basic settings and enable e-commerce functionality almost instantaneously. Let us take a look at the WooCommerce Setup Wizard and go over every option step by step.
Store Details
The first window you will encounter will be the Store Details section. You will need to provide your stores’ address and your e-mail. This allows WooCommerce to automatically configure currency options and shipping rules. You can change your address later if need be.

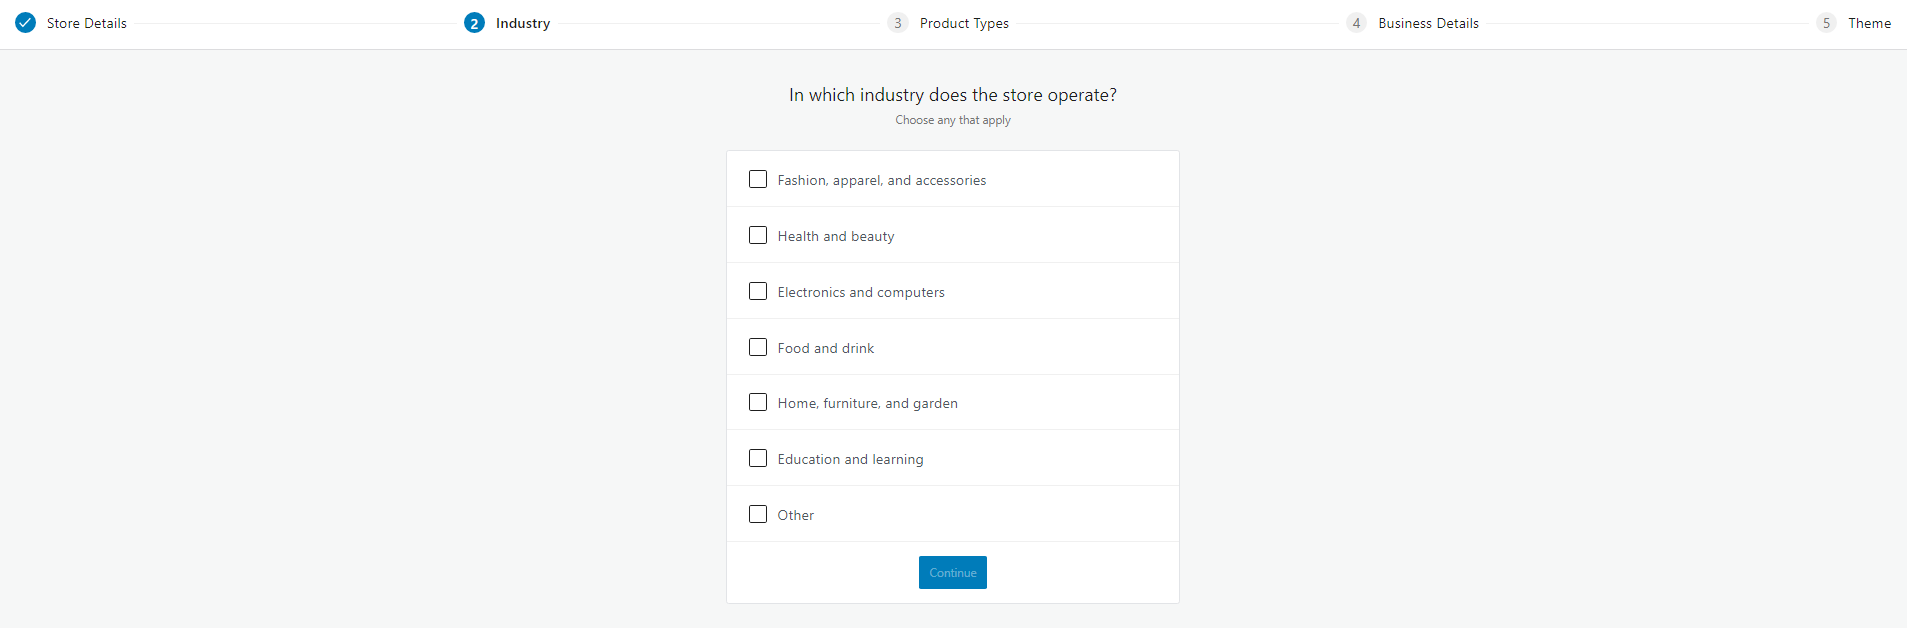
Industry
A rather self-explanatory option. You will need to pick an industry in which your store operates. It will help with your SEO efforts in the future and, consequently, will allow WooCommerce to distinguish an area of expertise your business functions in.
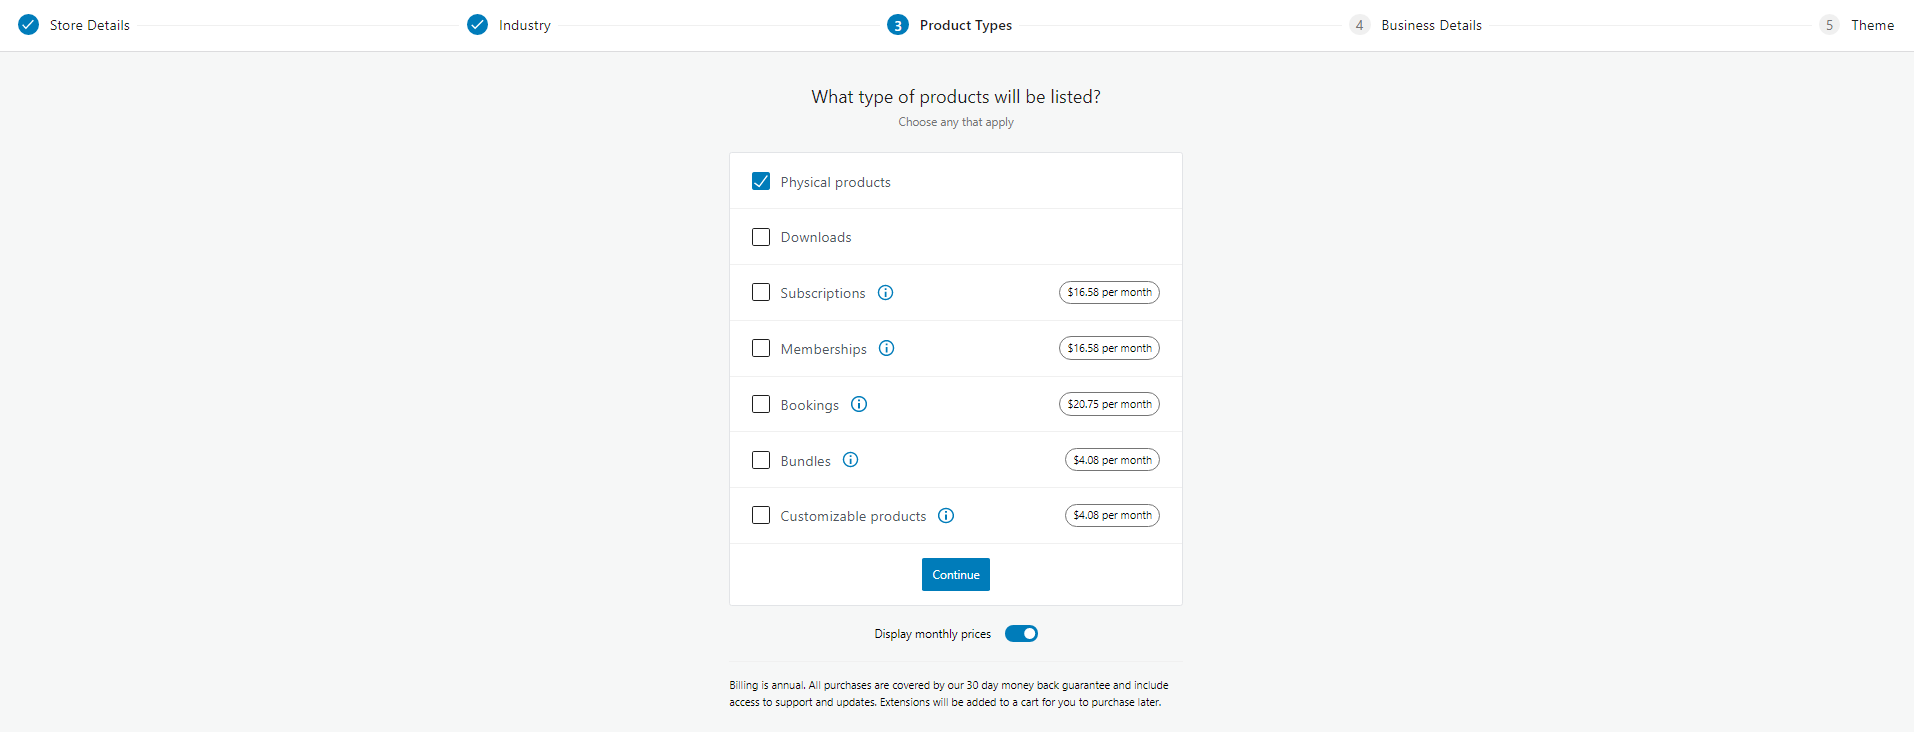
Product Types
Now you will need to list what kind of products will be sold in your online store. Physical and downloadable product options are free features, but, unfortunately, functionality for other product types (memberships, subscriptions, bookings, bundles, and customizable products) can only be enabled via paid plugins. There is much that can be accomplished only with the free features, so consider carefully whether you need any extra plugins at all. Right next to the paid product types you can see the pricing for each add-on plugin.
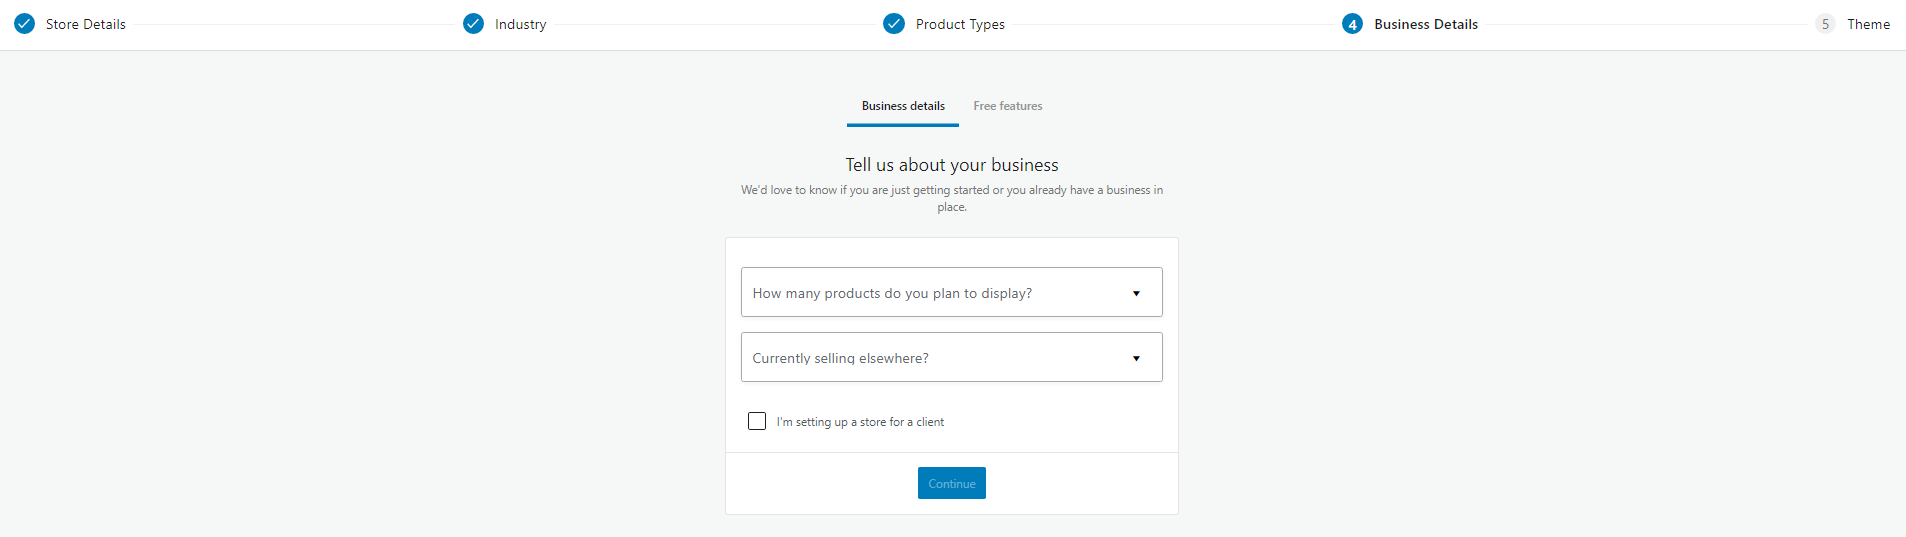
Business Details
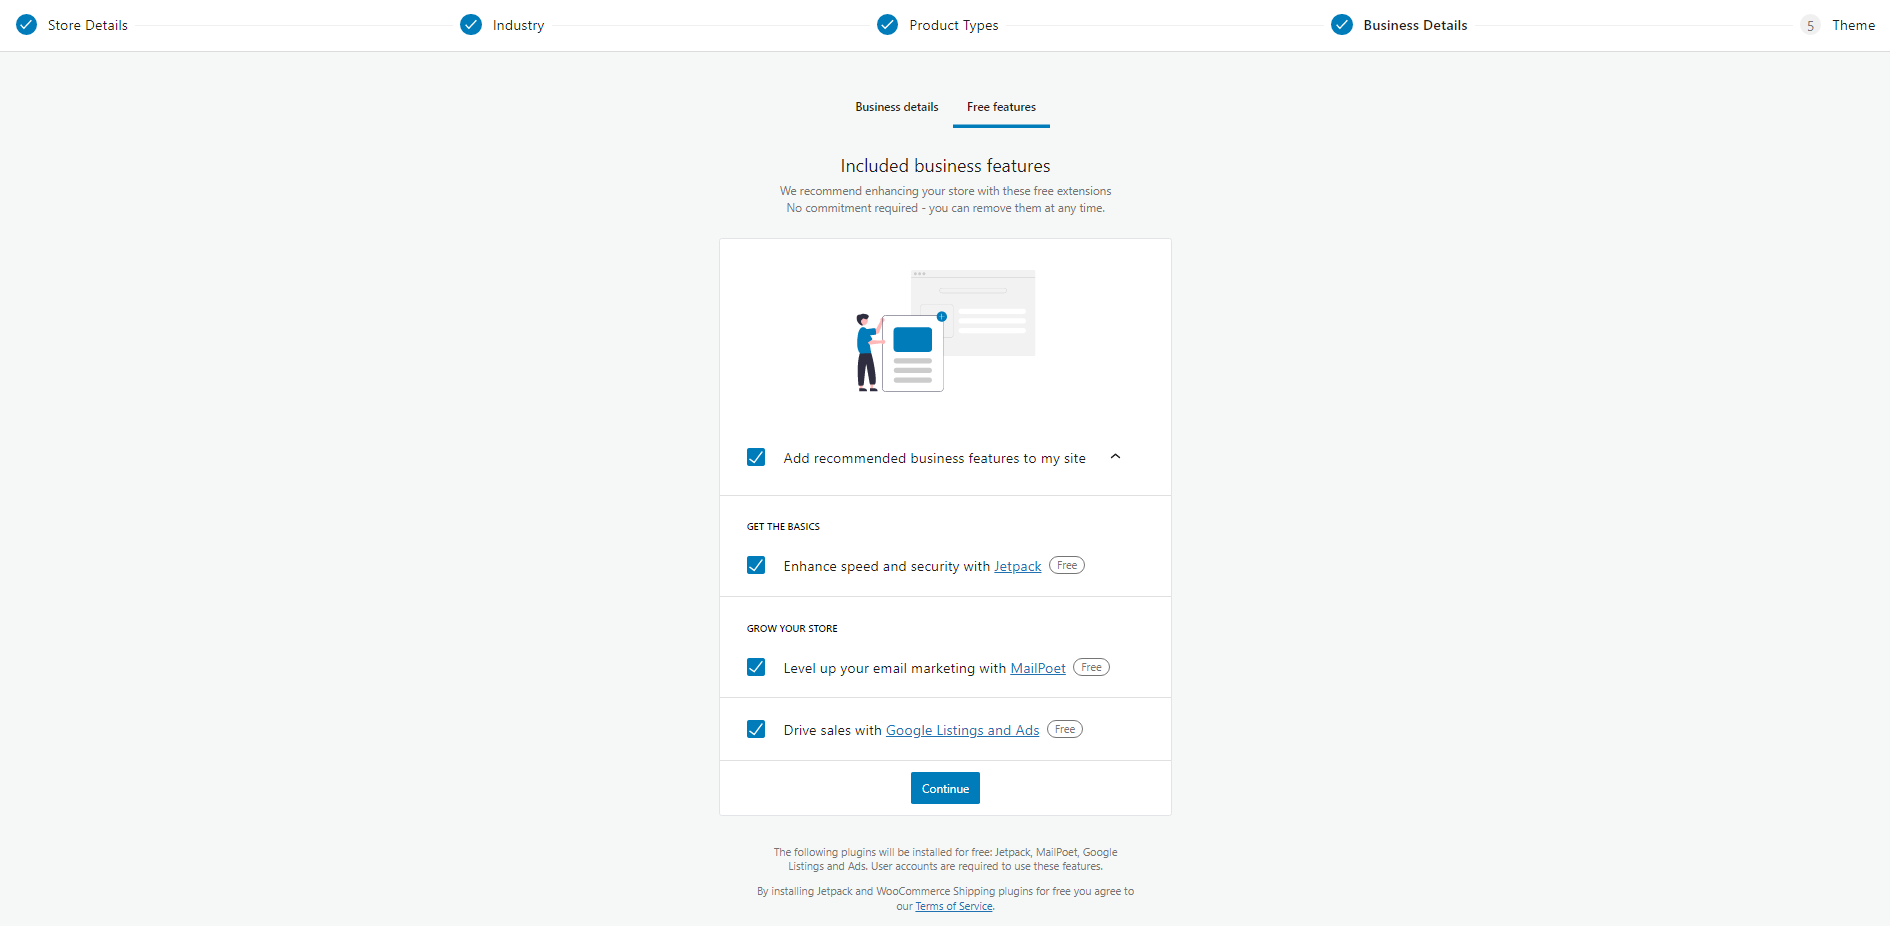
This section consists of 2 parts – Business Details and Free Features. Let us start with the Business Details. Here you can provide basic information about your business. The number of products you plan to display, whether you are currently selling your goods elsewhere, and other corresponding info. This section exists merely for feedback reasons, so WooCommerce could improve its features based on the data collected.
More useful features are displayed in the Free Features window. Here WooCommerce will offer you add free extensions to your website that enhance e-commerce functionality in one way or another. Some of the extensions are recommended based upon the settings you previously chose, so be careful with your choices. Take a look and decide whether these extensions will benefit your online store.
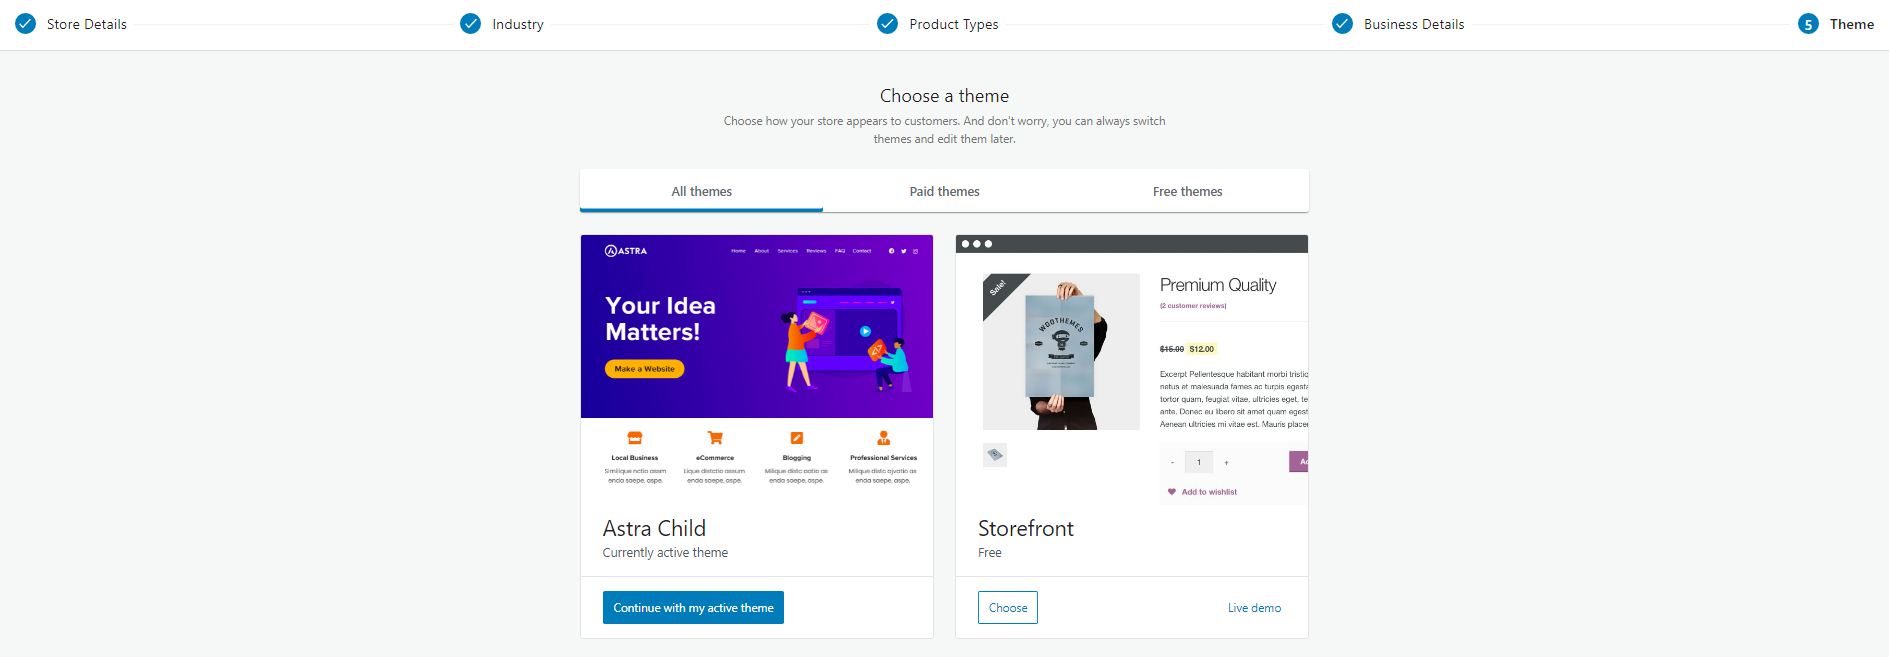
Theme
WooCommerce has been successfully integrated with most of the themes on the market. The lucrative integration has surely been one of the main factors behind the WooCommerces success. Pick a theme that best suits your needs. Keep in mind, that you can change your theme at any time and edit them afterward.
After completing the last step, you will be taken to the WooCommerce Home screen, where you will be able to configure the remaining features. You will see a checklist with the remaining WooCommerce features.
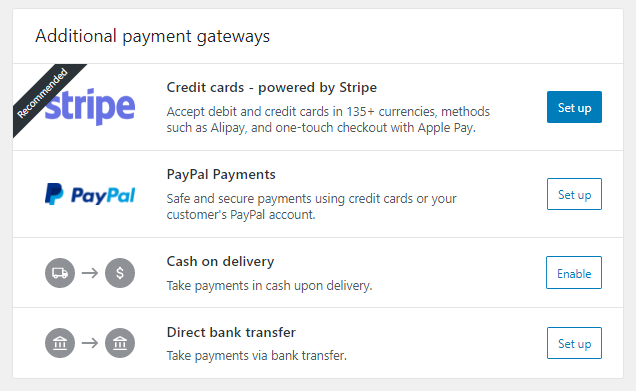
Setting up Payment Gateways in WooCommerce
Now that we have provided basic information, it is time to set up payment gateways. At the get-go, you are presented with 4 options:
- Stripe
- PayPal
- Cash on delivery
- Direct bank transfer
It is up to you to decide how your business would like to receive payments. Additionally, you can add extra payment gateways and use them in conjunction with one another. Take into account that you will need to set up each payment gateway separately. Most of the service providers have streamlined their setup process, so users would be able to complete the configuration as fast and efficiently as possible. You should take into consideration where your store is located, where you will be shipping your goods to, and what are common methods of payment in your region.
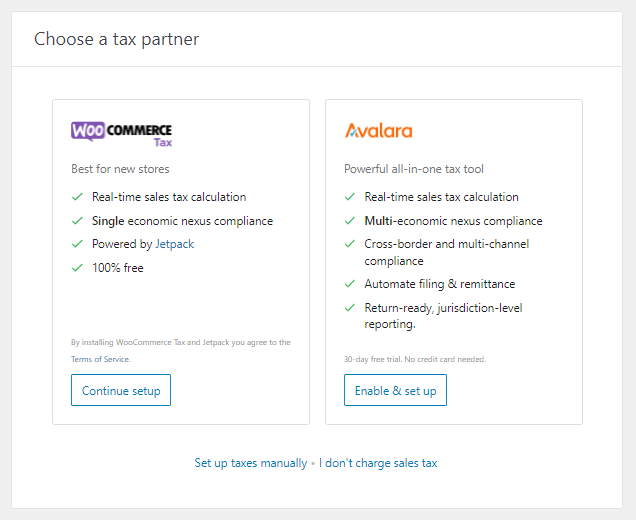
Setting Up Tax Options in WooCommerce
WooCommerce has an automated tax system extension. The first time you will open the Set Up Tax option, you will be asked to install two plugins – Jetpack and WooCommerce Tax. These are the culprits responsible for managing your taxes. Sales tax is calculated in real-time based on the location and settings you have enabled previously. Of course, you might not charge sales tax at all, therefore, there is a setting for that too. As an alternative, WooCommerce offers you to install the Avalara plugin. Unlike WooCommerce Tax, Avalara is a paid plugin with a 30-day free trial period. You can enable both of these plugins one by one, compare their features, and decide which one is better suited for your business. There are other plugins on the market that enable tax calculations, so you might want to take a look at the WordPress repository if these two do not live up to your expectations.
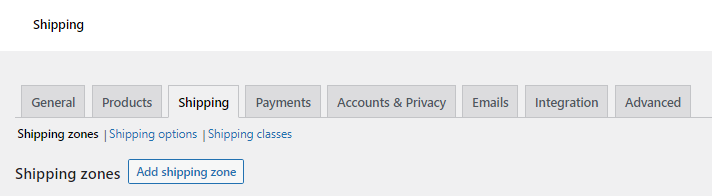
Setting Up Shipping Options in WooCommerce
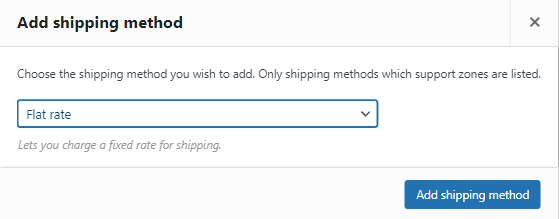
Basic information has been provided, payment gateways are set up and sales tax has been included in the price. So, now you will need to determine how your products will be shipped. Click on the Set Up Shipping tab and you will be re-directed to the Shipping section. Here, click on the Add Shipping Zone button.
It is time to set up your first shipping zone. Start by picking the name of your zone (Zone Name), then, select to what regions within your zone the goods will be sent to (Zone Regions), and determine via what methods the goods will be delivered (Shipping Methods).
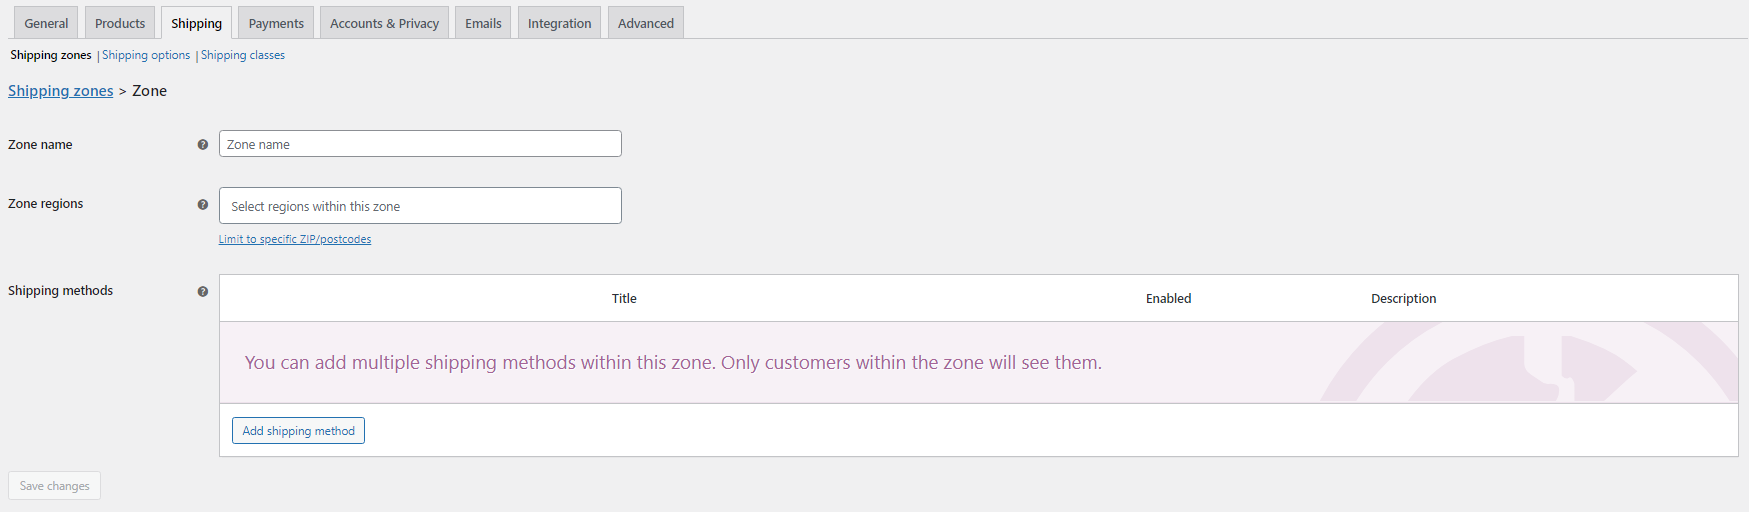
There are 3 types of shipping methods available to you- Flat Rate, Free Shipping, and Local Pickup. Flat Rate charges a fixed amount of money for shipping. Visitors that have spent a certain amount of money, used coupons, or bought a particular number of items can use the Free Shipping option. It enables free shipping for the aforementioned cases. And last but not least is the Local Pickup option. It does exactly what the name states, provides the visitor with the option to pick up the goods straight from your store or warehouse.
Next up, we have the Shipping Options tab. You can set how and when the price is displayed for your products(Calculations), what address will be the products delivered to (Shipping Destination) and whether you want to enable Debug Mode for WooCommerce in order to bypass the shipping rate cache.
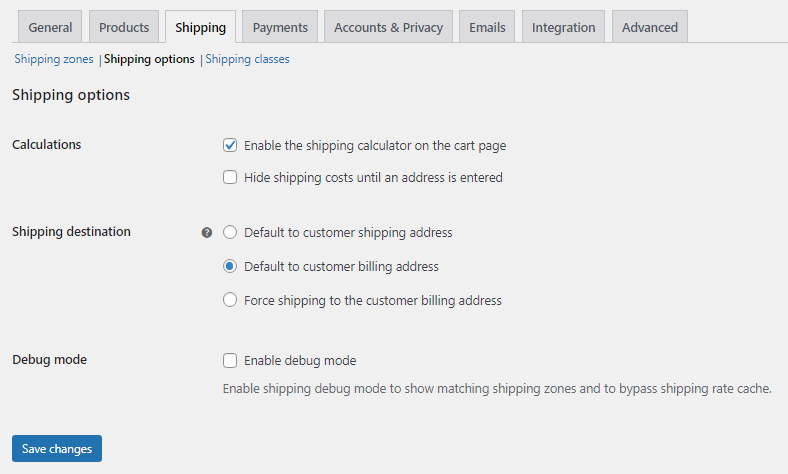
Now it is time to set up shipping classes. A feature, especially handy, for online stores with a large number of variable products and the like. Shipping classes can be used to group products of similar type and used by some shipping methods, such as Flat Rate Shipping, to provide different rates to different classes of product.

Setting Up Marketing Tools in WooCommerce
Nowadays, the e-commerce market has been flooded with various extensions that claim to improve your SEO rating. Even though every online store needs an ongoing marketing campaign, it is imperative to choose the right tools for the job. Here comes in play WooCommerce marketing tool setup.
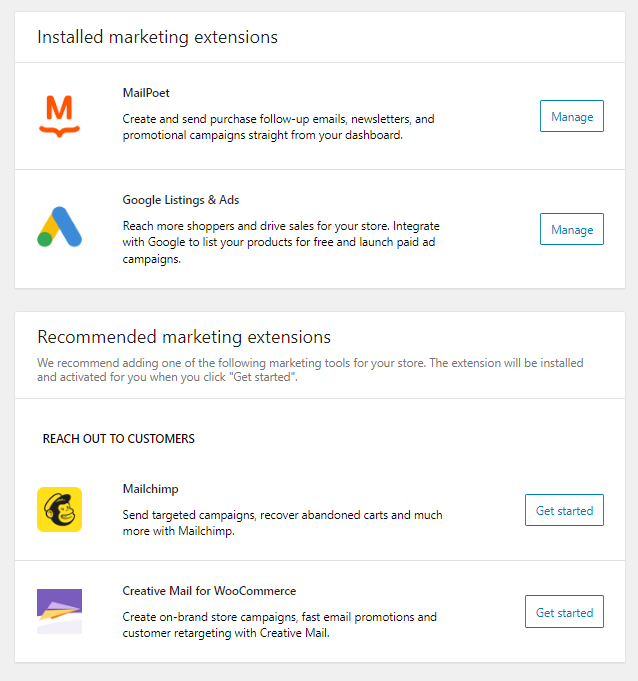
By default, you will be asked whether you want to install Google Listings & Ads, MailChimp, and Mailpoet. All of these extensions are useful in achieving better results in your SEO efforts. Keep in mind that some features are only enabled with the paid versions. You can always add additional extensions, Yoast SEO is one of the most common ones. Take time figuring out what kind of extension/plugin will benefit your online store the most.
Finally, we have gone through WooCommerce Setup Wizard! Now that we are done with the basic setup, we can continue and discuss the remaining basic features of WooCommerce.
Managing Orders in WooCommerce
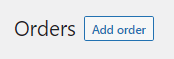
WooCommerce has a dedicated Orders section where you can manage all of your store orders. It is located in your dashboard, in the WooCommerce dropdown menu, under the Home tab. Of course, your order list is now empty. Nevertheless, we can take a look at how to add new orders manually. Click on the Add Order button.
As you can see, all kinds of information concerning orders are available for you to tinker with- order creation date, payment status, billing address, shipping address, and so forth.
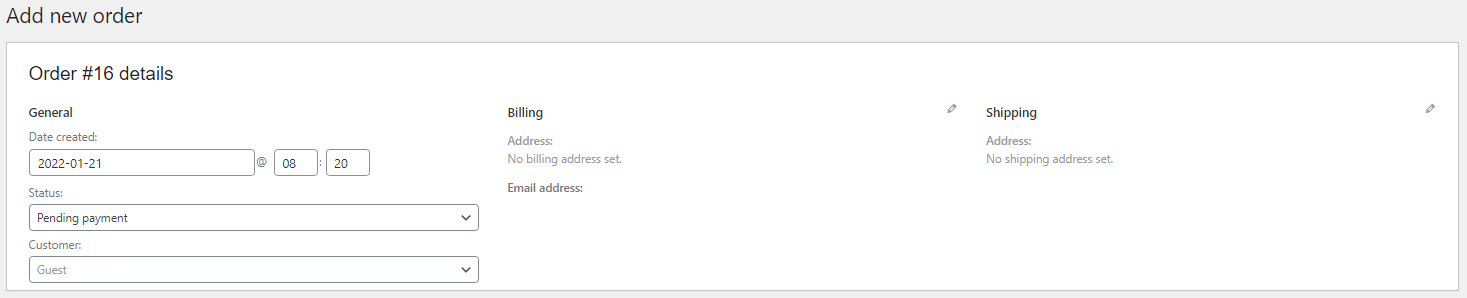
The Item section is rather thought-provoking though. You can add new items, set additional fees, apply coupons, change tax plans, et cetera. By combining different conditions, you will be able to create a custom order tailored to your clients’ needs.

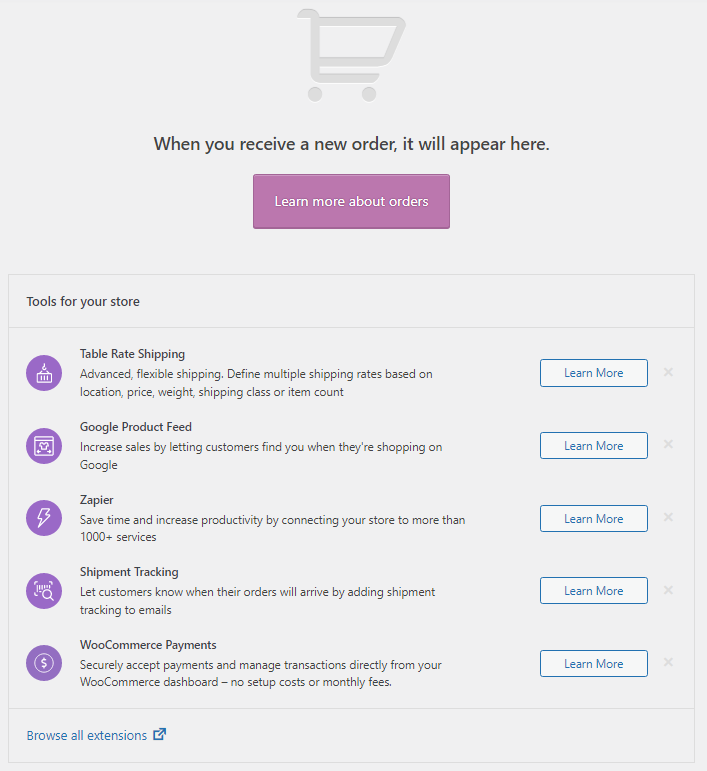
Let us take a step back and revert to the main Orders window. Underneath the order list, you will see the Tools for Your Store section. WooCommerce offers you to install additional official extensions that add supplementary functionality to your orders. Most of these have a cost attached to them, so consider carefully what exactly your online store needs and are the extra features worth the price. At the bottom of the page is the Browse All Extensions button, which will re-direct you to the WooCommerce extension store.
Customer Overview in WooCommerce
No online store would be complete without a dedicated customer section. WooCommerce has implemented a simple but efficient UI, that allows the user to quickly examine existing customers and information connected to them. This synopsis is instrumental in collecting stats and seeing the general pattern in customer trends. In the following paragraphs, we will discuss where these stats can be seen and what conclusions can be made from the collected information. Before the release of WooCommerce 4.0 statistics were gathered and displayed in the Report section, but now there is a more detailed option available- Analytics. We will discuss the Analytics section at the end of this article.

Adding and Managing Products in WooCommerce
One of the main strengths of WooCommerce is the flexibility with which the products can be added. Almost any type of product you can imagine is sold on the WooCommerce platform. But there is a catch, as we mentioned before, for more specific products, for instance, bookings, you will need to buy additional plugins in order to enable their functionality. Nonetheless, let us see what can be achieved without additional extensions. We will guide you through a step-by-step product creation process.
Product types
Before we begin, let us take a look at WooCommerce product types and note the differences between them:
- Free product types
- Simple product – Most common product type in online stores. Mainly, it is a physical product, but it can be virtual and downloadable too.
- Grouped product – A cluster of simple products that together form a new product. Any number of child products can be assigned to the grouped product. Keep in mind that customers can buy any of the child products separately.
- External/Affiliate product – Products that are sold in your store, but are not originally created and sold by you. Customers who would like to buy such a product will be redirected to the URL of the particular product.
- Variable product – Let’s you add numerous variations and attributes to your simple product in order to create more complex and sophisticated products. One of the most useful features in all of WooCommerce.
- Paid product types
- Subscription product – Allows you to create and manage simple and variable subscriptions. You can set up an efficient recurring payment schedule, create conditions and tune other aspects of subscriptions.
- Bookable product – Products that need to be booked in advance. You will be able to define time slots and create different options for rentals, bookings, appointments, and the sort.
- Membership product – Sells memberships and provides restricted access to varying membership levels. Mostly used in conjunction with other product types and plugins.
- Bundled product – Allows you to create an array of products. You can group together any type of product besides Grouped and External
- Auctions – Enables auction functionality in your WooCommerce store. Various configurations for auctions are available, for instance, you can specify auction start/end times and set bid increments.
Fortunately, the most common product types are available from the get-go. In most cases, online products are, usually, either Simple products or Variable products anyways. If you believe that these product types will not suffice for your business, then feel free to purchase the aforementioned plugins in order to enable the functionality you desire.
Adding a New Product in WooCommerce
We will take a look at 2 different product types and how to create them in WooCommerce- a simple product and a variable product. It is important to note the discrepancies between the two, so you would have a better understanding of the basics of WooCommerce product creation.
Simple Product
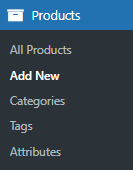
The most popular WooCommerce product type. Start with locating the Products tab in your WordPress dashboard and clicking on it. Consequently, a dropdown menu will appear. Now click the Add New tab and you will be re-directed to the product creation window.
As you can see, product creation starts with the Product Name and Description. These both are rather self-explanatory as they share a similar structure to any other WordPress page. Type in the corresponding information concerning your product.

Here comes the interesting part- the product Data window. Start by selecting the product type. In our case, a Simple Product. Leave the Virtual and Downloadable boxes unchecked. They add additional settings if your product is of digital nature.
![]()
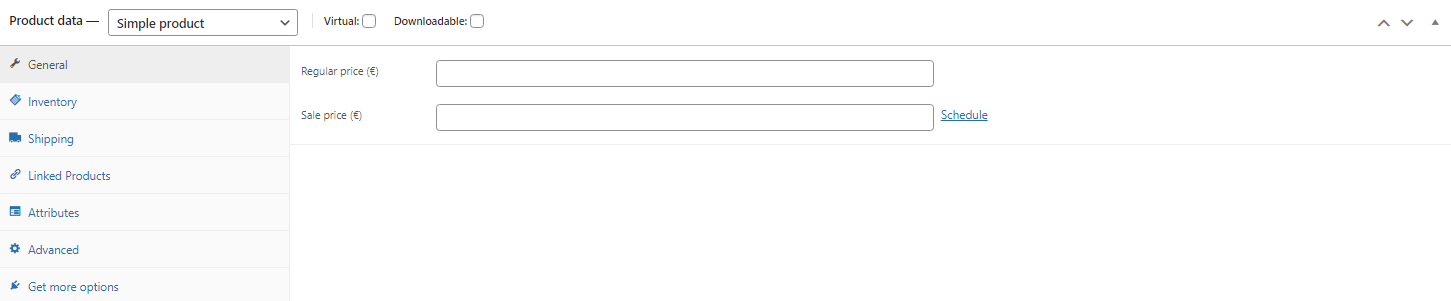
Now, let us start with the General settings configuration. Here you can set the Regular Price of your product. This will be the price of the product that will be displayed in your online store. Additionally, you can set a Sale Price and schedule the sale for the dates you desire. Furthermore, there are options for declaring Tax Status and setting Tax Class.
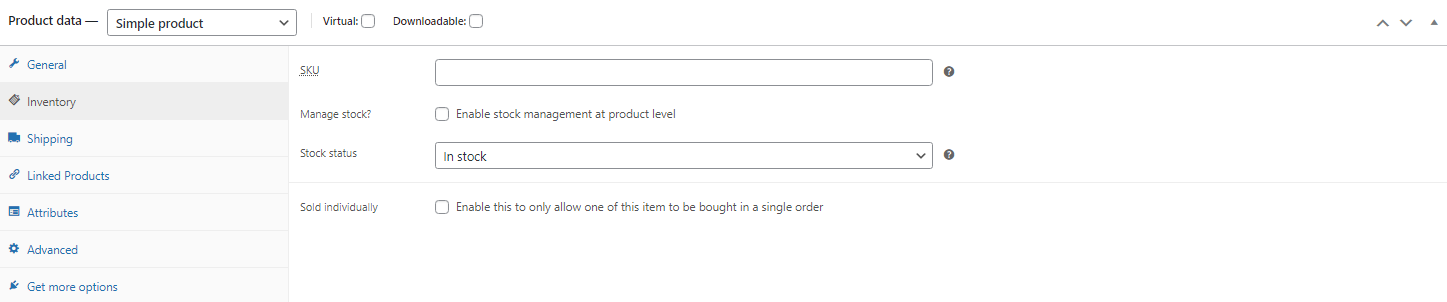
Next up is Inventory settings. You can define a unique SKU (Stock-Keeping Unit) for your product and manage the stock. You can regulate whether the product is in stock or out of stock via the Stock Status tab. Keep in mind, that if you check the Manage Stock box, then you will have to keep track of stock quantity constantly and update it accordingly. Additionally, decide whether or not you will allow backorders. Also, there is an option to set a threshold in case your stock drops below a specified amount so you could be notified via e-mail.
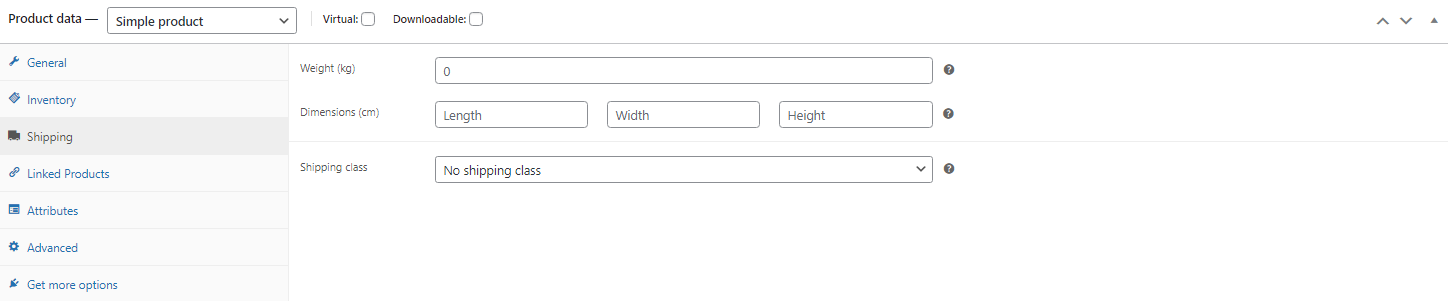
Shipping settings. Define the Weight and Dimensions of your product. If your particular product does not need to display any measurements, then feel free to leave these fields open. The most important of these settings is the Shipping Class. As we discussed previously, you can create different shipping classes in WooCommerce > Settings > Shipping. Here you can put these classes to use and assign each individual product their own class. A most useful feature that you should take note of, especially, if your online store ships goods to other countries or regions.
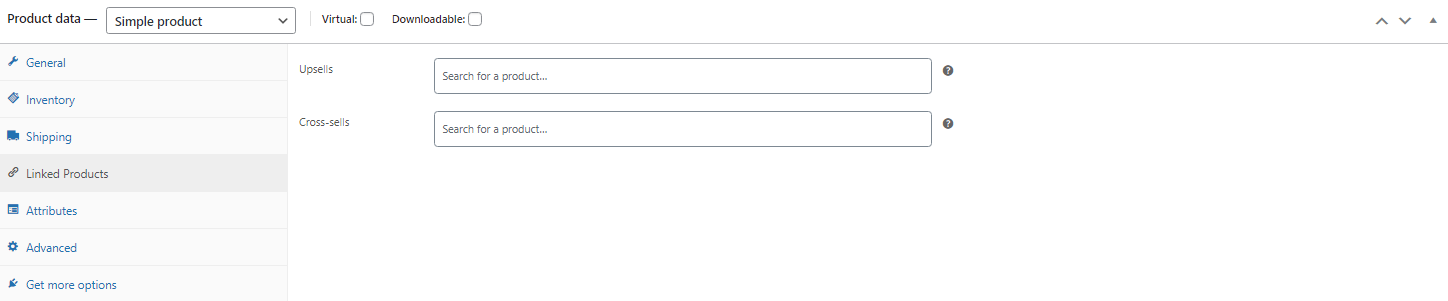
Next in order, Linked Products. You can assign Upsells and Cross-sells to your product. Upsells are similar products that are of higher quality and price than the current product. These products will be recommended when the customer will view this particular product. Cross-sells are products that will be promoted on the cart page, usually, products of related nature.
Attributes settings. Probably, one of the most important WooCommerce product settings there is. Here you can add various attributes to your product. For instance, if your online store sells clothing, then two rational attributes would be Size and Color. You can create global attributes and then assign them to each product individually, but we will get to that later. For now, play around with various attributes to get a general grasp on how they work in WooCommerce. We will discuss them in detail when we will be creating a variable product.

Last but not least are the Advanced settings. Here you can type a Purchase Note for your customers. They will receive this note after they have purchased the product. Next up is the Menu Order tab. It regulates in what sequence the products will appear in the product list. The lower the value of the number, the higher the item will be on the product list. Additionally, you can Enable Reviews so your customers can leave feedback.
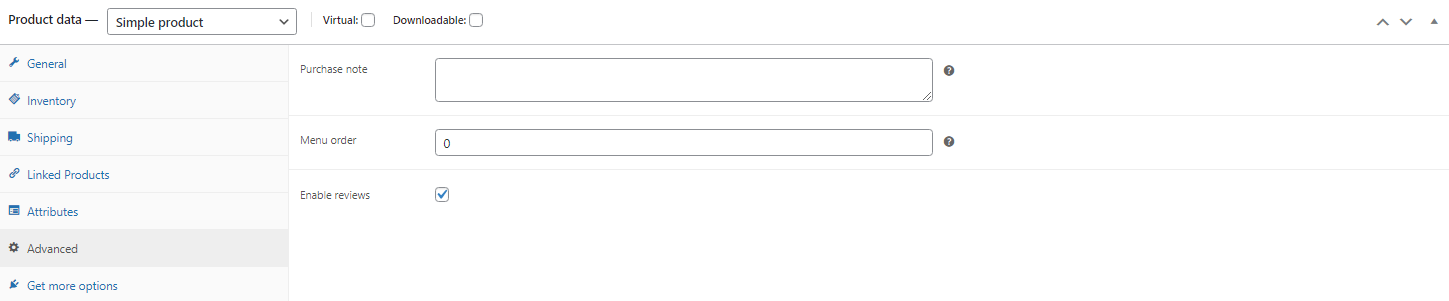
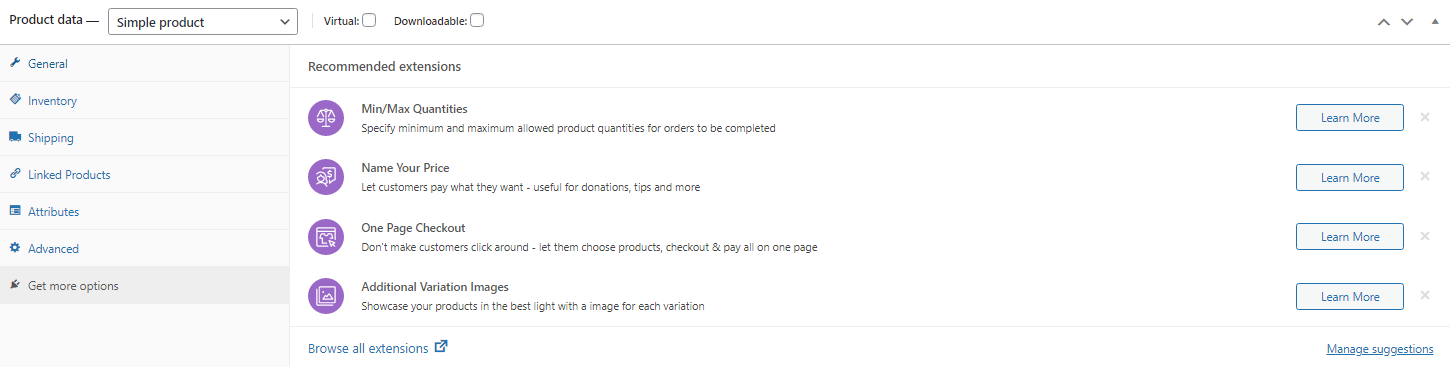
Well, there is one more window of settings left- Get More Options. In itself, it does not add additional functionality but offers you to do so via supplementary plugins. By clicking Learn More, you will be re-directed to the WooCommerce marketplace where you will be able to purchase the plugin you desire. You can click on the Browse All Extensions to take a look at the complete WooCommerce store and skim through all extensions that catch your eye.
All you have left to do is assign categories and tags for your product, but we will get to that a bit later in this article. For now, click the Publish button, and, voilà, your new simple product has been created.
Variable product
You have gotten a grasp on how a simple product is created and now we can take a look at variable product creation. In essence, a variable product is the same as a simple product but with differing parameters(variations). For instance, if your online store sells a t-shirt, then it will have varying properties- color, size, et cetera. So, a variation could be a blue L t-shirt and a red S t-shirt. Imagine how tedious and time-consuming it could be to add each product variation separately. Thankfully, with WooCommerce variable products, we can create all variations within a single product screen.
![]()
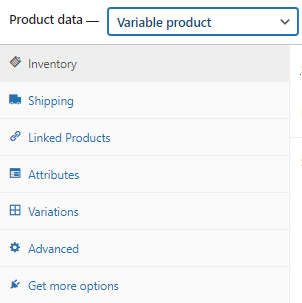
Pick Variable Product in your Product Data window. As you can see, Variable Product settings are almost identical to Simple Product settings besides the additional window called Variations. Fill out the corresponding fields apart from Attributes and Variations. You can follow our Simple Product guidelines if you skipped the previous paragraph.
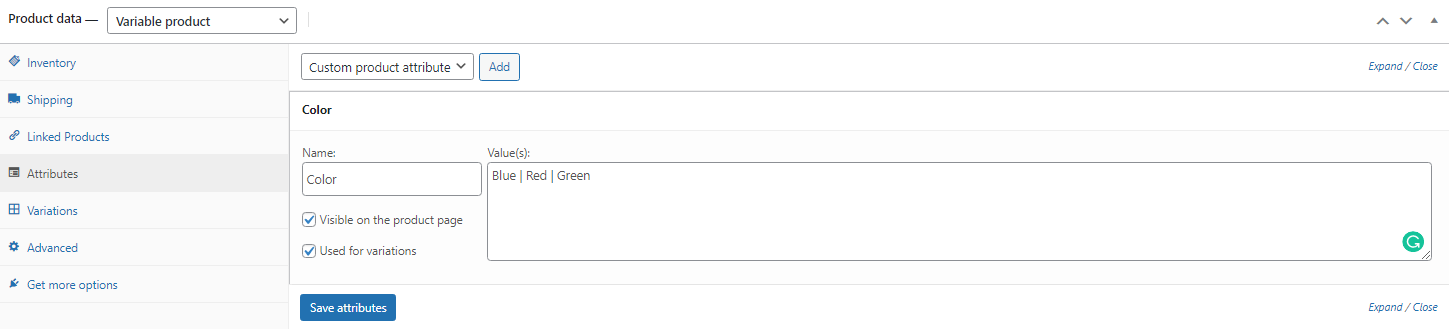
First off, Attributes. Here you can input different attributes that this particular product has. You can create your own attributes from scratch via the Add button or pick global attributes that you have created previously (we will discuss this later in this article). In the example mentioned before, a t-shirt could possess two logical attributes- size and color. Create these attributes with numerous values as a practice for the future. Remember to separate different values with the “|” sign. There are 2 checkboxes under the attribute name window- Visible on the product page and Used for variations. They do exactly what they state, so make sure to tick them both. Do not forget to Save Attributes!
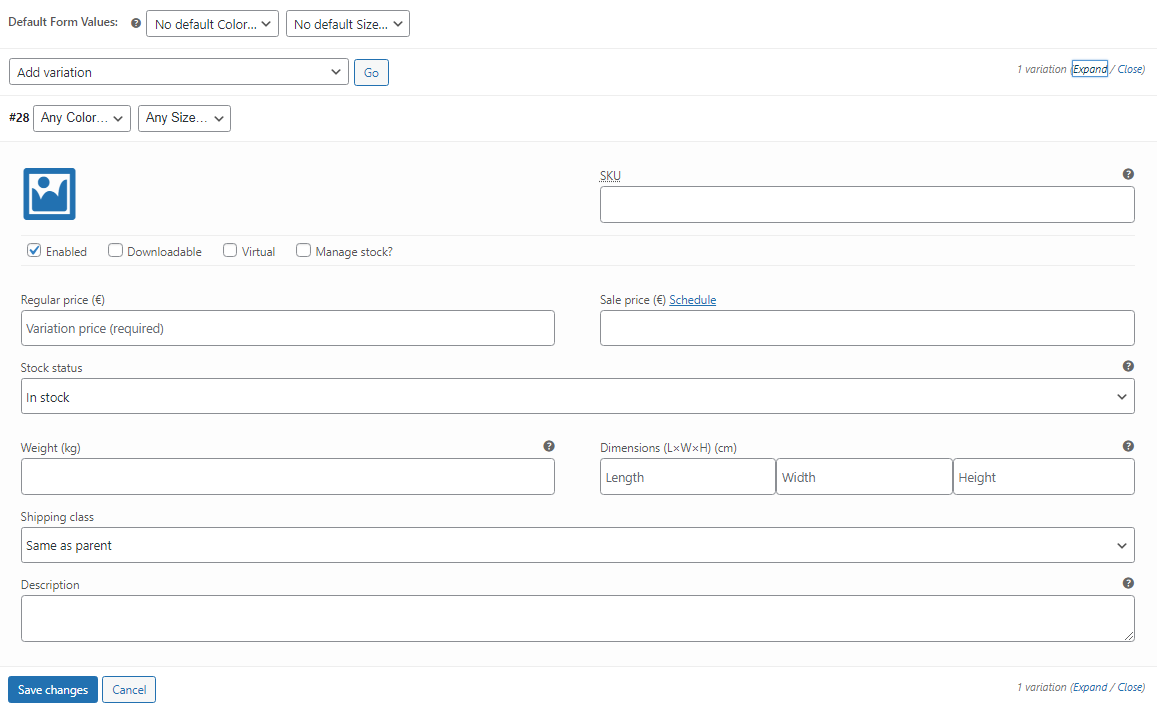
Now head off to the Variations settings. A dropdown window is available to you with 2 options- Add Variation and Create Variations from All Attributes. Add variation allows you to create a custom variation based on the attributes you applied in the Attributes settings. Click Go and a new variation will be created. Now you can select attributes for this particular variation.

If you will click on the Expand text, then additional settings for this specific variation will appear. Even though every variation inherits settings from its parent, some variations might have differing parameters, for instance, an XL t-shirt has different dimensions (width, length, etc.) than an XS t-shirt. Besides Dimensions, you can regulate both the Regular and Sale price, create a unique SKU, manage Stock Status, set Shipping Class and Tax class, and add a Description. Remember to Save Changes.
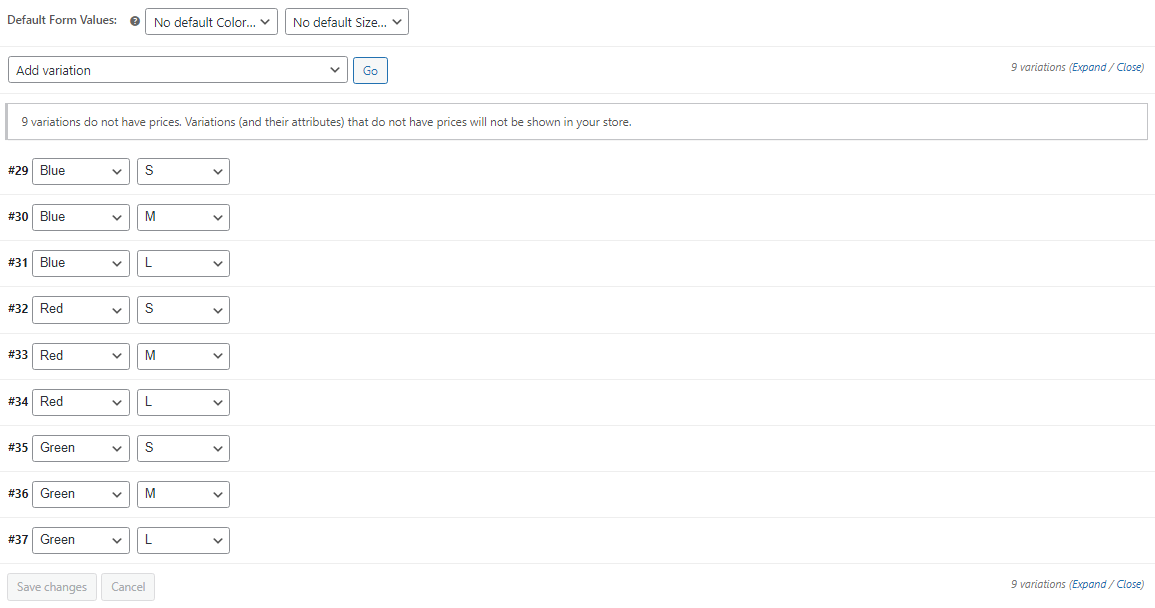
Creating variations manually can get tiresome quickly. Delightedly, WooCommerce has automated the process with the Create Variations from All Products feature. Every variation based on your attributes is created by a simple click of a button. If your variations possess varying parameters, then they will still have to be added manually. Nevertheless, at least you will not have to worry that you might have skipped a variation or two.
In the same manner as before assign tags and categories if need be, double-check the product settings and click the Publish button.
Attributes
If your online store has a large number of variable products for sale, then manually assigning attributes to each and every product can become incredibly time-consuming. WooCommerce has a dedicated section for creating attributes. You can find it under Products in your dashboard.

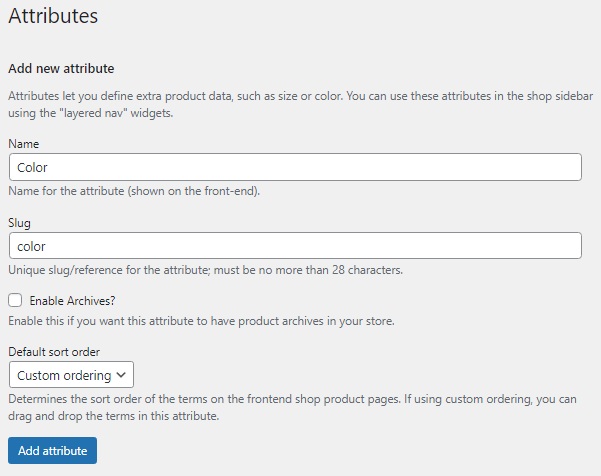
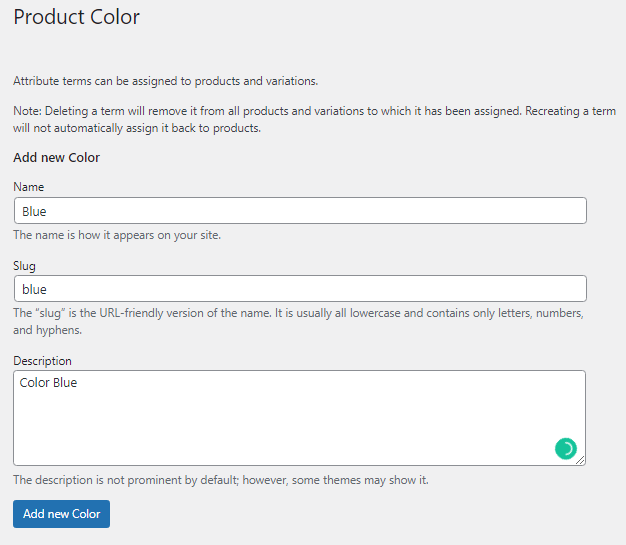
As an example, let us create a color attribute. Type in “Color” in the Name window and do the same for the Slug. Next up is the Enable Archives? option. If enabled, then a new page will be created where you will be able to see all products that have this particular attribute. Leave it unchecked for time being. Now you will have to decide how your products will be sorted by their attributes on the front-end shop via the Default Sort Order window. Pick the Custom Ordering option, so we would be able to manually drag and drop our attributes precisely how you want. Click on the Add Attribute button to finish the setup.
You have created an attribute and now it is time to assign values to it. In the attribute overview window, you will see your newly created attribute. Take note of the Configure Terms under the Terms column and click on it.

You will be re-directed to a new window. Here you will be able to create parameters for your attribute. Let us start with three colors- blue, red, green. Type in their name, slug, description and click on the Add New Color button. Do the same for other colors.
Head back to Attributes and you will see that the color attribute now has the aforementioned terms.

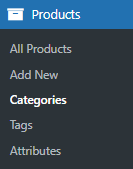
Categories and Tags in WooCommerce
Keeping your online store organized with properly assigned categories and tags is a good habit, that allows customers to quickly find the product they desire. WooCommerce has dedicated sections for Categories and Tags that can be found in your dashboard under Products. Let us start with Categories.
Categories
In short, WooCommerce categories are broad groupings of a certain set of products, that share similar properties. For instance, a t-shirt could be under the “clothes” category. WooCommerce has made category creation rather straightforward.
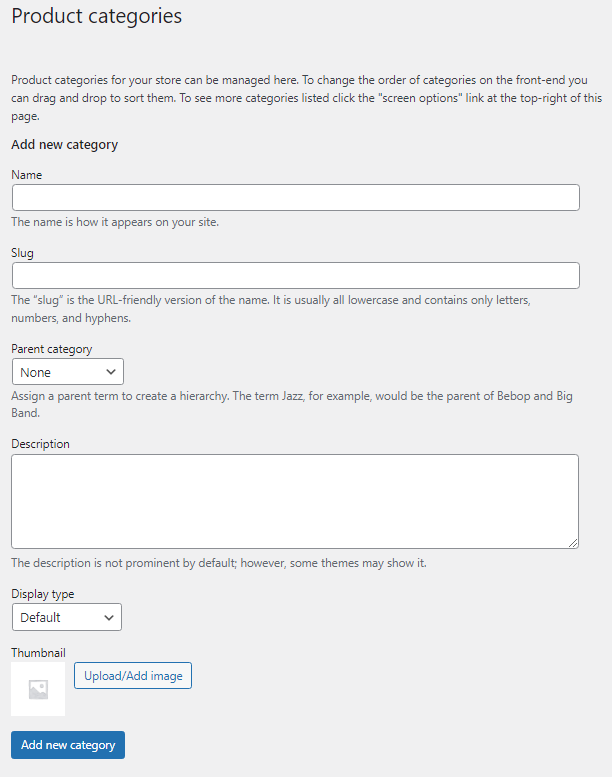
Start with assigning a Name for your category. Afterward, give your category a Slug. Next up is the Parent Category. If this particular category is a subcategory of another, then you will need to assign it in order to create a proper parent > child hierarchy. You can give your category a Description if you need it for design purposes. Choose the Display type. Decide what is shown on the categories landing page. Standard uses your theme’s default. Subcategories will display only the subcategories. Products only display products. Both will display subcategories and products below that. Lastly, Upload/Add Image. Choose an image that describes your category. All you have to do now is press the Add new category button.
Tags
Tags are another way how we can connect different products with each other. Unlike categories though, tags do not have a hierarchy. Consequently, products from a wider spectrum can be grouped together enabling your customers to quickly find what they need.
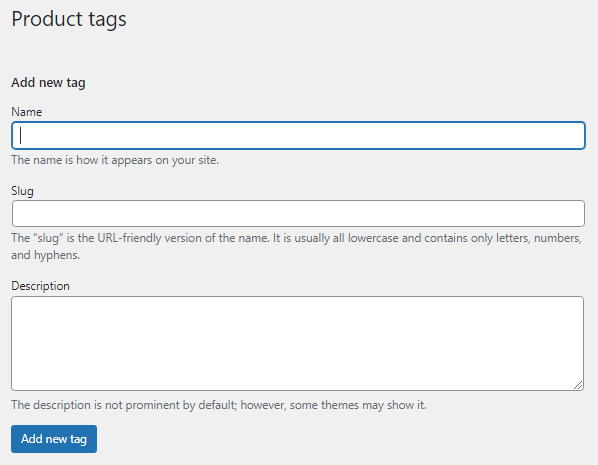
Creating tags is works the same way as categories. Choose a Name for your tag, then a Slug, and give your tag a Description. Finally, press Add new tag button. Honestly, a significant amount of online stores forgo tags altogether and use just categories, but it mostly happens in cases where the number of products is rather small.
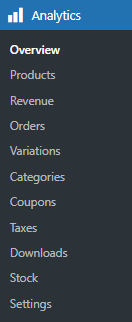
Analytics
As we mentioned previously, before the release of WooCommerce 4.0 statistics were gathered and displayed in the Report section, but now there is a more detailed option available- Analytics. Keep in mind that WooCommerce Analytics only work with WordPress 5.3 and later versions.
Every e-commerce store should take note of the statistics available to them. It is of the utmost importance to gather insight on facets that drive the stores’ traffic. By regularly keeping track of Analytics, you will be able to notice customer trends and preferences more clearly. You can take a look at our previous article to get a general grasp of the statistics WooCommerce offers.
Final Words
Undeniably, WooCommerce is one of the most efficient and powerful plugins on the WordPress repository. With a clear-cut UI and extensive amount of features, WooCommerce continues its victory march as the lead online store extension. We wish your online store a prosperous future and stay tuned for more articles, cheers!


