How to Display Your Custom Post Types in Elementor
Table of Contents
In this tutorial, we will learn how to create a custom post type in WordPress and successfully integrate it in Elementor. Historically, WordPress has been a content management system. It started out as a platform for blogging but eventually evolved into a complex tool for maintaining sophisticated websites. Nowadays, WordPress has a 60.8% market share in the CMS market. The success of WordPress could be partially attributed to the fortuitous implementation of custom post types.
By utilizing Elementor Pro, you can manage these custom post types and develop content according to your needs. Custom fields are an invaluable asset to custom post type creation. These two, when working in unison, are instrumental to building intricate websites. Let us take an in-depth look at custom fields, custom post type creation and their relationship with Elementor.
Custom Fields and ACF
What is a custom field? In essence, custom fields are pieces of additional information, that can be added to your website via plugin or by applying code. We will get to the coding part later, but for the time being, let us discuss the most popular plugins for custom field creation. Three of the most prominent plugins are:
- Advanced Custom Fields (ACF)
- Pods
- Toolset
For the sake of this tutorial, we will use ACF. In a nutshell, ACF is a plugin that allows the user to add custom meta fields on WordPress Pages, Posts, Custom Post Types and control the flow of content with relative ease. Basically, it uses custom post meta in order to augment your content with anatomically structured data. Custom fields can be made into meta boxes in return enabling you to process vast amounts of information fairly easily.
So, why are we discussing custom fields? Well, if you are creating custom post types, then, most likely, you will be populating them with custom fields. Most of the time these two work hand in hand. An immense amount of content can be made dynamic with proper use of Custom Fields and Custom Post Types. Thankfully, Elementor has integrated both of these features within their page-builder plugin and now users are able to create custom metadata without writing a single line of code.
What is a Custom Post Type?
Every WordPress user is familiar with two of the most common post types: Pages and Posts. Although similar, Posts are chronometrical listings, but Pages are hierarchical in their structure (parent > child, etc.). Posts make use of taxonomies, for instance, Tags and Categories, while Pages do not. As we can see, each post type is crafted with a specific goal in mind, for a particular type of content. By default, WordPress supports 8 different post types:
- Post
- Page
- Attachment
- Revision
- Navigation Menu
- Custom CSS
- Changesets
- User Data Requests
There is an infinite amount of post types that do not fit into either of these categories. As a consequence, WordPress allows its users to create custom post types, referred to as CPTs. Web developers and designers alike implement CPTs in most of their websites. With smart use and ample experience, custom post types can be tailor-made to support and showcase any content imaginable. With Elementor, we can design this content further and decide how it will be applied to our website.
Custom Post Type Examples
For a beginner in WordPress development, it is imperative to recognize the type of content that can be constituted as a CPT. Especially nowadays, when a lot of custom metadata (often with relatively small input information) can be added without the implementation of custom post types. For instance, there is no need to create custom metadata for a small number of portfolios when the Elementors Portfolio widget can do the exact same thing but more efficiently. Of course, if the amount of portfolios is immense, then creating a custom field and custom post type for them is easier than constantly manually editing the widget.
Examples
Let us take a look at common custom post types and the elements within that are customizable:
- Portfolio sites
- Name of the client
- Work performed
- Materials and/or technology used
- Team members involved
- Year
- Project description
- E-commerce sites
- Price
- Variations
- Quantity
- Size
- Color
- Rating
- Review sites
- Title
- Author
- Genre
- Release date
- Rating
- Poster
- Description
- Staff and team pages
- Staff members
- Images
- Work roles
- Respective department
- Years in the company
- Recipe sites
- Type of food
- Cooking time
- Preparation time
- Portions
- Nutritional values
- Rating
- Real estate listings
- Size / square meters
- Number of floors
- Number of bedrooms
- Images
- Price
- Location
- Contact information
- Business directories
- Type of business
- Location
- Opening hours
- Customer testimonials
- Contact information
As you can see, almost any type of data can make use of custom post types, but it is up to you to decide whether it is worth it. We highly recommend using custom post types for the aforementioned websites and similar ones. Even though your website started with only a few custom field elements, it might grow in scope and the vast amount of elements could prove overwhelming to handle manually. Now, let us take a look at how custom post types can be created by using plugins.
Creating Custom Post Types with Plugins
First of all, you will need some mock data to populate our new custom post type. As we previously mentioned, we will be using ACF for this purpose. You can check out our previous blog post for an in-depth look at ACF field creation and their integration within Elementor.
Now that you have created custom fields, we can commence with custom post type creation. Firstly, you will need to find and install the CPT UI plugin. After activation, you will notice that there is a new panel in your WordPress dashboard named “CPT UI”.
If you click on the “CPT UI”, then a dropdown menu will appear. You can locate all these menu items within the CPT UI main panel, but as a convenient feature, you can gain access to them via the dropdown menu.
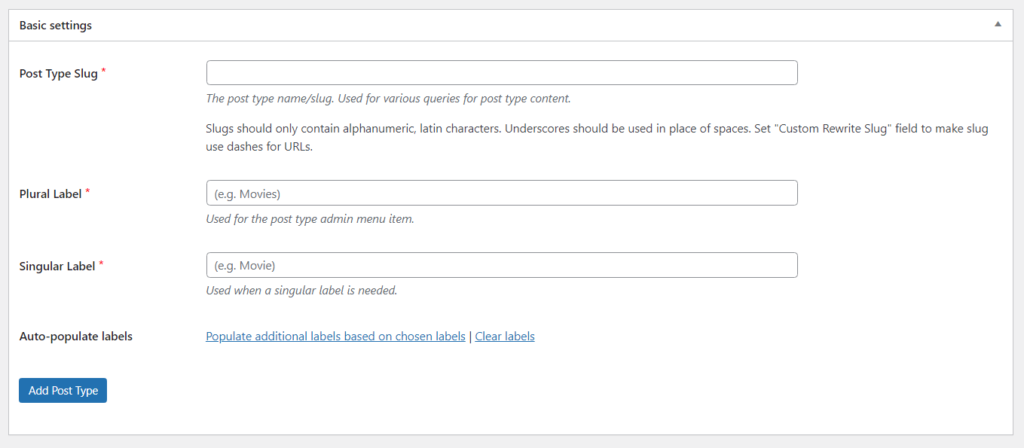
Now that we have located the CPT UI main panel, we can take a look at different possibilities the CPT UI plugin offers us. The first menu item is “Add/Edit Post Types”. You will see options for creating new custom post types, editing existing ones, or importing and exporting custom post types. For the time being, this is the only section we will use. We will gloss over other prospects a bit later in this article. Click on the “Add New Post Type” window. Numerous settings will open up. If you are new to WordPress web development, then it all might seem overwhelming. But fret not, honestly, it is a lot easier than it looks. Let us take a look at basic settings and what they represent.
Basic Settings
As you can see, all of the input fields are mandatory, as noted by the red star. The “Post Type Slug” is, basically, the name of your custom post type. Keep in mind that the slug is used for various queries concerning the post type content, so, consequently, it should have a clear and concise name. Next, you will see “Plural Labels” and “Singular Labels”. They are used for recognizing the post type name in your admin dashboard. For instance, if your new custom post type is about Movies, then it should be named so.
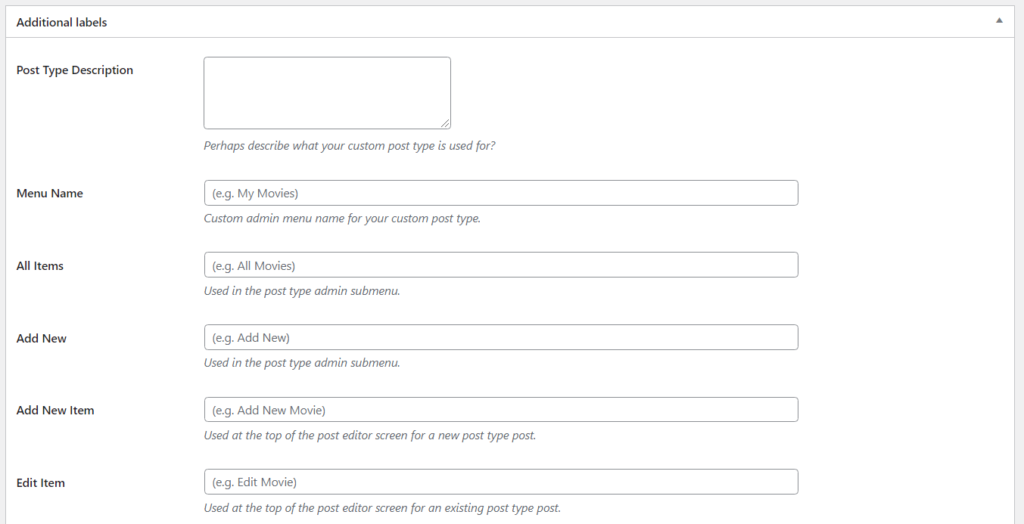
There is an additional option called “Auto-populate labels”. The next batch of settings- “Additional labels”, uses it. This particular option populates the aforementioned “Additional labels” input fields with data based on the labels chosen before in the “Basic Settings” window. It is a highly appreciated feature among web designers and developers that saves a lot of time and resources during the development process.
Additional labels
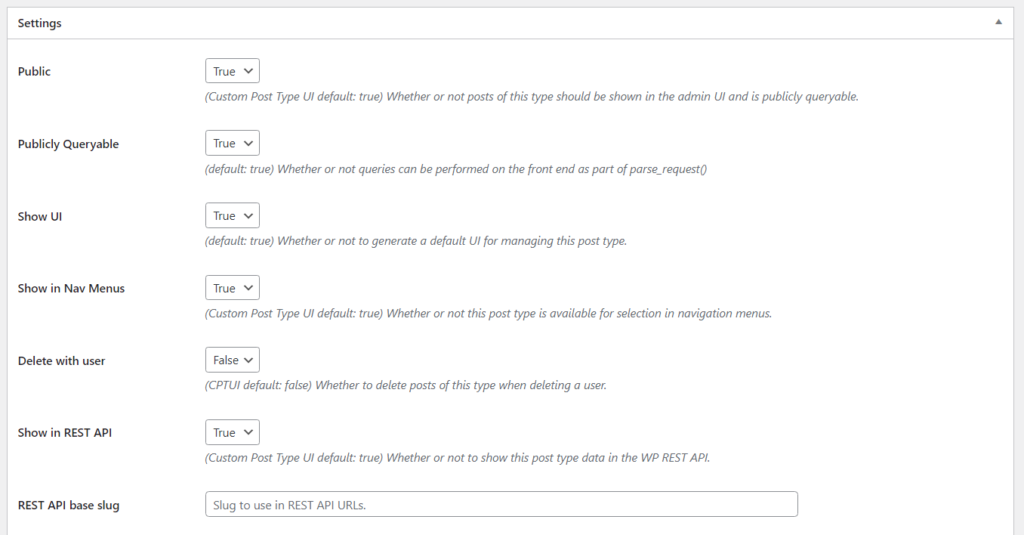
The “Additional labels” fields have been filled and we can continue to the “Settings” window. Here you can find general settings about your custom post type, such as, whether your post is made public, can it be shown in the navigation menu, what kind of post editor features are supported, and so forth. As you will notice, there is quite a handful of settings to choose from, but, thankfully, every one of them has a description right underneath the input fields. You should try out each and every possibility in order to understand the core concepts of custom post type creation and how the CPTs can be implemented in your Elementor-built website. Keep in mind what kind of a message your custom content should convey and how it could be integrated in the website via CPT usage.
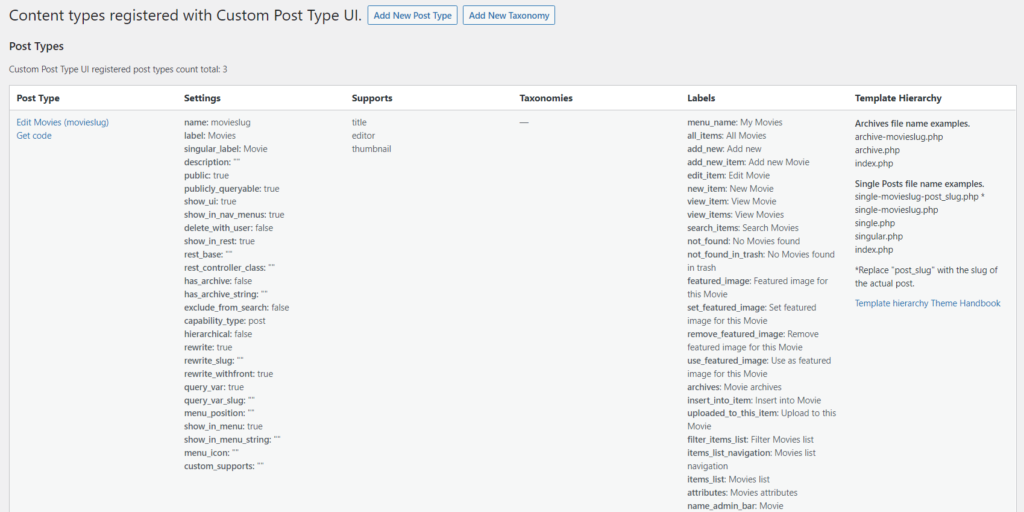
All of the fields have been filled and you must have triple-checked the input data! We can finally click on the “Add Post Type” button and create the custom post type. If you will head back to the top of the CPT UI menu, then you will see the “View Post Types” window. Here you are able to see all of your CPTs and their respective settings, supports, taxonomies, template hierarchy, and labels. It is an accessible way in which to oversee your previous work and gather the necessary info about any changes if need be.
Finishing Touch
You might have noticed that there is an empty window underneath your CPT called “Taxonomies”. CPT UI allows creating custom taxonomies for our CPTs as well. Even though we will not be discussing them in this article, it is important to note that websites with a specific goal in mind might need to employ rather tricky taxonomies in order to keep data organized and structured. Elementor has successfully integrated both the CPTs and custom taxonomies in their page builder so the web developers would have an easier time adding all these custom features to their websites.
A new menu item has appeared in your dashboard and your first custom post type has been created. You will probably want to design the custom content to your desire. If you click on the “Add New” button, then you will be presented with a standard WordPress page editor. Honestly, you might be wondering- where has the “Edit with Elementor” button disappeared? Well, to use CPTs in Elementor, you will need to activate them via the Elementor settings. After locating the settings, go to the General section, and tick your custom post type in the Post Types window. Every Elementor feature now is at your disposal and you can tailor-make the CPTs your hearth’s content.
Remember those ACF fields you created before? Now you are able to see, why they work so well together with CPTs. Just by filling a few fields and applying dynamic content where need be, we can quickly and efficiently add and manage a large quantity of data. Both custom post types and custom fields are imperative for WordPress website development. The sheer scope of design capabilities they bring to the table is almost limitless and will greatly enhance the workload you or your team will be able to bear.
Custom Post Types and Elementor
Elementor integrates custom post types through the use of dynamic content. Most of the text-related widgets can use dynamic content and display data from the custom fields you previously created. For instance, the text editor widget is one of the most common ways to achieve this. Locate the dynamic content icon right next to the “Text” button in the widget panel and click on it. A multitude of options will upon up in a new dropdown window. Locate the “ACF Field” item and click on it.
You will notice that even though the input field has been filled, nothing has changed in the design. Consequently, you will need to click on the field again and a dropdown window will open in which you will be able to select precisely the kind of custom content you want to display.
Now that your post has been populated with all kinds of data and the design is complete, you can save your post as a template, so it can be applied to every custom post type you have created. You can create a new template from scratch and then apply it to all your custom posts too.
By utilizing Elementor’s Theme Builder, you can create Archive and Single Post templates for your Custom Post Types and edit the conditions under which the CPTs will be displayed on your website. It is up to you to decide which type of approach is the most convenient for your website’s needs.
Creating Custom Post Types with Code
If you are well-versed in coding and not afraid to tinker with the files of your theme, then feel free to create CPTs by applying the code manually. Take a look at the following code below:
function create_post_type() {
register_post_type( ‘elementor_product’,
array(
‘labels’ => array(
‘name’=> _(‘Products’),
‘singular_name’ => _(‘Product’)
),
‘public’ => true,
‘has_archive’ => true,
)
);
}
add_action( ‘init’, ‘create_post_type’ );
This particular piece of code needs to be added in the functions.php file in your themes root directory, located in the Theme Editor. As a consequence, be sure to write the code in the child theme, or you risk experiencing the “white screen of death” and rendering all your work inaccessible. In general, you should always post custom code in the child theme. As you can see, it is incredibly efficient to implement custom post types in your website via the usage of code. The more experienced you will become, the more advanced CPTs you will be able to create.
Final Words
Custom post types are an invaluable part of website creation. With careful planning and smart implementation, you will be able to accommodate your brand new website to every type of data out there. Even though the CPTs might seem overwhelming at the beginning, there are highly advanced plugins available for free that help with CPT creation. Together with Elementor, CPTs have almost limitless design capabilities. Keep in mind to activate your CPT in Elementor Settings! With ample time and experience, you will be able to map out a CPT just from the first glance at the data. Stay tuned for more articles, cheers!
Frequently asked questions
Can I display custom post types in Elementor using this method if they have custom taxonomies or meta fields?
The article focuses on displaying custom post types in Elementor using the Posts widget, which primarily pulls content from the default WordPress post type. It may not address the display of custom post types with custom taxonomies or meta fields out of the box. You may need to use additional plugins or custom code to extend Elementor’s capabilities and ensure compatibility with custom post types that have unique taxonomies or meta fields.
Will displaying custom post types in Elementor affect the styling and layout of my website’s theme?
The method described in the article for displaying custom post types in Elementor utilizes Elementor’s Posts widget, which allows you to control the layout and styling of post content within Elementor. While the appearance of custom post types displayed in Elementor can be customized to match your website’s theme, it’s essential to consider how the styling and layout may integrate with your theme’s overall design aesthetic. You may need to adjust your theme’s styling or use custom CSS to ensure a seamless visual integration.
Can I filter or sort custom post types displayed in Elementor based on custom taxonomies or meta fields?
The article does not specifically address filtering or sorting custom post types displayed in Elementor based on custom taxonomies or meta fields. While Elementor’s Posts widget offers some filtering and sorting options for standard post types, additional customization may be required to filter or sort custom post types based on custom taxonomies or meta fields. Consider using plugins or custom code to implement advanced filtering and sorting functionality as needed.
How can I ensure that custom post types displayed in Elementor are optimized for performance and page load times?
While the article provides guidance on displaying custom post types in Elementor, it may not cover optimization techniques for ensuring optimal performance and page load times. When working with custom post types in Elementor, it’s essential to consider factors such as caching, lazy loading, image optimization, and minimizing server requests to improve performance. Utilize caching plugins, optimize images and assets, and implement performance best practices to ensure smooth and efficient page loading.
Are there any compatibility issues or considerations to be aware of when displaying custom post types in Elementor?
The article does not address potential compatibility issues or considerations that may arise when displaying custom post types in Elementor. While Elementor is widely compatible with various WordPress themes and plugins, conflicts or display issues may occur, particularly if custom post types are registered with unique settings or functionalities. It’s recommended to test custom post type displays thoroughly across different devices and browsers and address any compatibility issues promptly through custom code or plugin adjustments.


